


RQT8327
22
Scheduled recording
See also the notes “Important notes for recording” (Ô page 18).
You can enter up to 16 programs up to a month in advance. (Each
daily or weekly program is counted as one program.)
Preparation
• Turn on the television and select the appropriate video input to suit
the connections to this unit.
• Check that the time on the unit is correct.
• Press [DRIVE SELECT] to select the DVD drive.
• Insert a disc (Ô page 20).
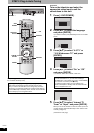
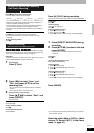
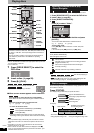
1 Press [SCHEDULE].
2 Press [e,r] to select “New Scheduled
Recording” and press [ENTER].
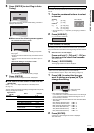
3 Press [q] to move through the items
and change the items with [e,r].
• Press and hold [e,r] to alternate On (Start time) and Off
(Finish time) in 30-minute increments.
• You can also set Channel, Date, On (Start time), and Off
(Finish time) with the numbered buttons.
• You can also press [REC MODE] to change the recording
mode.
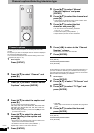
n To set daily or weekly timer
Press [w,q] to select “Date” and [e,r] to select daily timer
or weekly timer.
n To enter title name
Press [w,q] to select “Title Name” and press [ENTER]
(Ô page 39, Entering text).
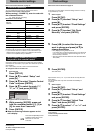
4 Press [ENTER].
“z” lights on the unit’s display to indicate that scheduled
recording standby has been activated.
• Repeat steps 2–4 to schedule other recordings.
Note
When the disc is removed, scheduled recording standby is canceled
(the “z” indicator goes out). You can put the unit back on standby by
inserting a recordable disc (the “z” comes on again).
n To return to the previous screen
Press [RETURN].
n To exit the screen
Press [SCHEDULE].
n When recording a channel (not set on this unit)
from cable box or satellite receiver
1 Press [e,r] to select IN1 or IN2 in the channel column (Ô above,
step 3).
2 Select the channel on the equipment before the scheduled time.
Depending on the type of disc used for recording or the type of
broadcast, there may be restrictions on the title you are trying to
record.