


ENGLISH – 69
Special Features
6. Use the colorimeter to
measure the luminance (Y) and
chromaticity coordinates (x, y).
7. Press ▲▼ to select the colors,
and press ◄► to select their
values.
8. After all the data has been input,
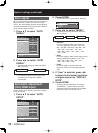
press MENU.
The “MEASURE MODE” screen will be
displayed.
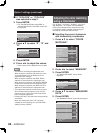
Inputting the coordinates of a
desired color
9. Press ▲▼ to select
“MODE”.
10
. Press ▲▼ to select “7COLORS”.
11
. Press ▲▼ to select “TARGET
DATA”
.
12
. Press ENTER.
The “TARGET DATA” screen will be displayed.
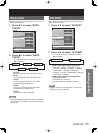
13
. Press ▲▼ to select “R, G, B” or
“Cy, Mg, Ye, Wh”.
14
. Press ENTER.
The “TARGET DATA: R, G, B (or “Cy, Mg, Ye,
Wh”)” screen will be displayed.
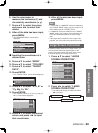
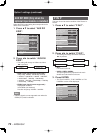
15
. Press ▲▼ to select the desired
colors, and press ◄► to input
their coordinates.
•
■
•
•
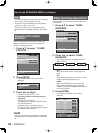
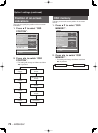
ENTER
MEASURE MODE
MODE
MEASURED DATA
TARGET DATA
AUTO TESTPATTERN
MENU SELECT
SUB MENU
709MODE
ON
ENTER
MEASURE MODE
MODE
MEASURED DATA
TARGET DATA
AUTO TESTPATTERN
MENU SELECT
SUB MENU
709MODE
ON
ENTER
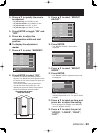
TARGET DATA
TARGET DATA:R,G,B
TARGET DATA:Cy,Mg,Ye,Wh
MENU SELECT
SUB MENU
ENTER
TARGET DATA
TARGET DATA:R,G,B
TARGET DATA:Cy,Mg,Ye,Wh
MENU SELECT
SUB MENU
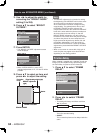
TARGET DATA: R, G ,B
R
G
B
MENU SELECT
ADJUST
x
y
x
y
x
y
0.670
0.330
0.650
0.630
0.150
0.050
TARGET DATA: R, G ,B
R
G
B
MENU SELECT
ADJUST
x
y
x
y
x
y
0.670
0.330
0.650
0.630
0.150
0.050
16
. After all the data has been input,
press MENU.
Note
If “3COLORS” or “709MODE” has been selected as
the “TARGET MODE” setting, only the 3 colors R, G
and B will be input for “TARGET DATA”.
If “709MODE” has been selected as the “TARGET
MODE” setting, the 3 primary colors defined by the
ITU-R BT.709 standard will be set as the target
data.
If the target data is outside the color range of the
projector, the colors will not be projected correctly.
Large Screen Correction
If watching images close up on a large screen, you
can correct the colors that appear lighter on the
screen so that they appear the same as the colors
that would appear on a normal-sized screen.
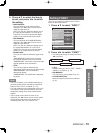
1. Press ▲▼ to select “LARGE
SCREEN CORRECTION”
.
2. Press ◄► to switch “LARGE
SCREEN CORRECTION”.
The setting will change as follows each time
◄► is pressed.
OFF (No correction)
1 (Low)
2 (High)
•
•
•
•
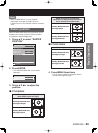
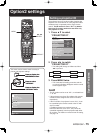
OPTION1
COLOR MATCHING
LARGE SCREEN CORRECTION
AUTO SIGNAL
AUTO SETUP
BACK COLOR
DVI EDID
AUX DVI EDID
P IN P
FUNC1
OSD POSITION
OSD MEMORY
MENU SELECT
CHANGE
OFF
OFF
OFF
BLUE
EDID2(PC)
EDID2(PC)
OFF
P IN P
2
ON
OPTION1
COLOR MATCHING
LARGE SCREEN CORRECTION
AUTO SIGNAL
AUTO SETUP
BACK COLOR
DVI EDID
AUX DVI EDID
P IN P
FUNC1
OSD POSITION
OSD MEMORY
MENU SELECT
CHANGE
OFF
OFF
OFF
BLUE
EDID2(PC)
EDID2(PC)
OFF
P IN P
2
ON