


Pelco Manual C650M (12/98) 15
5.0 CONTROLS
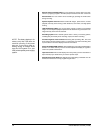
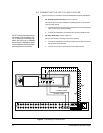
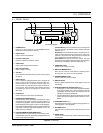
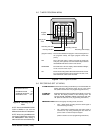
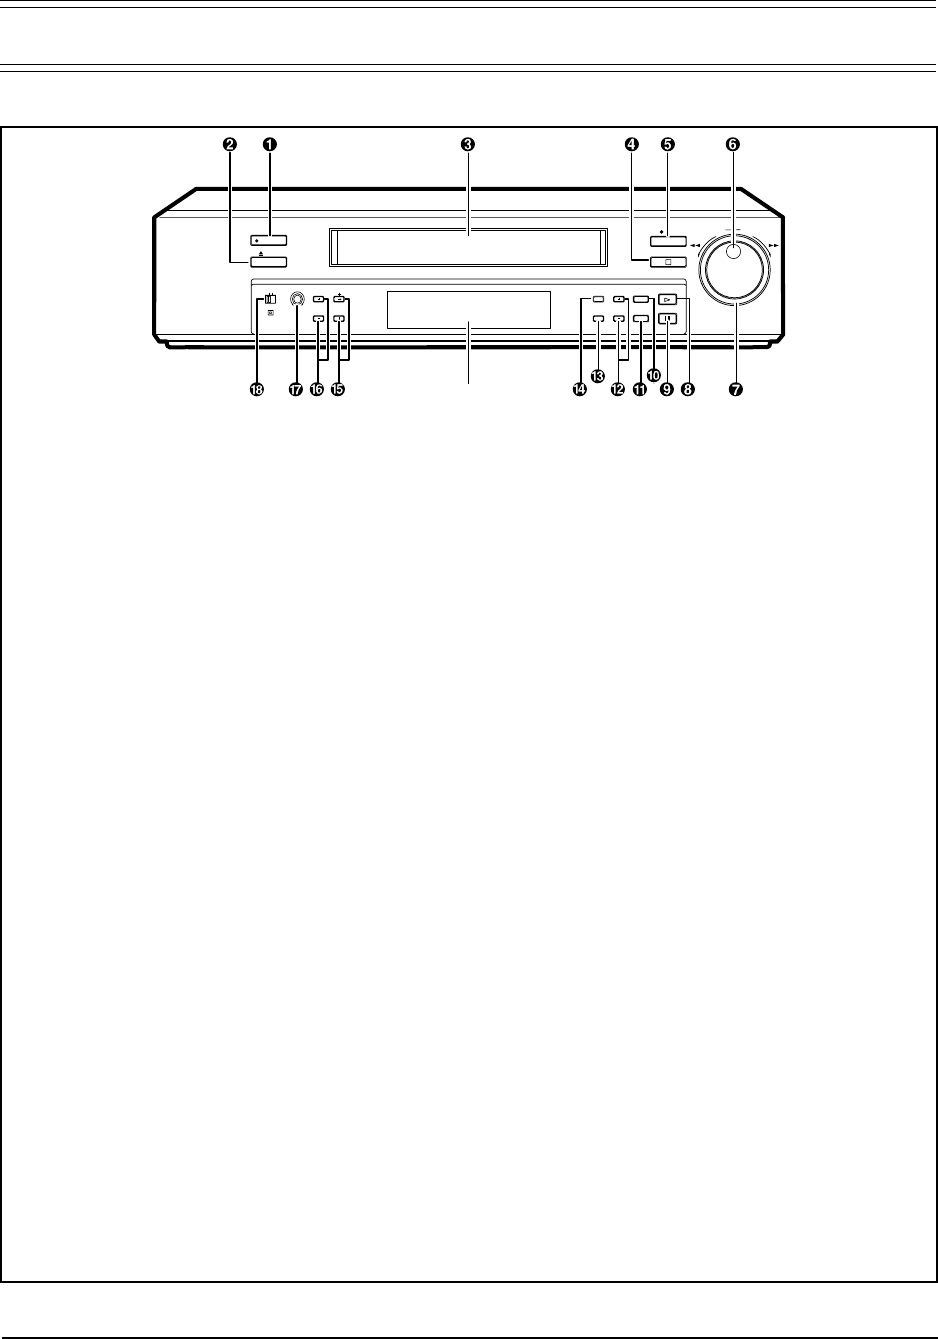
5.1 FRONT PANEL
1. POWER button
Press for on; press again for off. The POWER indicator
illuminates when the VCR is turned on.
2. EJECT button
Press to remove the cassette.
3. Cassette loading slot
Insert the cassette in this slot to load it.
4. STOP button
Press to halt all tape-related functions.
5. REC (record) button
Press to begin recording.
6. JOG dial
Use to advance the tape frame-by-frame and to program
the menus.
7. SHUTTLE ring
Use to adjust the playback speed and to program the
menus. Turn this ring to the right to advance the tape or to
forward search. Turn it to the left to rewind a tape or to
reverse search. You can also use it to clear the alarm list,
power loss list, timer recording, and to initialize the menu
programming. It also lets you program or exit the menus
after setup.
8. PLAY button
Press to play back a previously recorded tape.
9. PAUSE/SHUTTLE HOLD button
Press this button during recording to temporarily stop tape
movement. Press again to resume recording. When it is
pressed during playback, tape movement stops and a still
field is displayed. Press again to restore normal playback.
Pressing and holding this button after turning the SHUTTLE
ring allows continuous high-speed playback even if the
SHUTTLE ring is released.
10. COUNTER MEMORY/SKIP/INDEX button
Press this button to switch among counter memory (fluo-
rescent display shows M), skip search (displays SKIP), and
index search (displays INDEX).
Counter Memory: Turn the SHUTTLE ring to the right and
the tape rewinds to the 00000 counter position and stops
(Section 10.1.1).
Skip Search: The VCR fast forwards or rewinds until it lo-
cates an index signal and then plays back for about four
seconds in 2H or 6H mode, doing this until it reaches the
end or beginning of the tape (Section 9.3.2).
Index Search: During fast forward or rewind, the VCR
searches for alarm signals. When it finds one, the VCR plays
back the tape and stays in still mode (Section 9.3.1).
11. TIMER REC button
Press to make a timed recording.
12. REC/PLAY MODE buttons
Set to 2H, 6H, L12H, or L24H mode for recording; and to
2H, 6H, L12H, 12H, L24H, or 24H for playback.
13. COUNTER RESET button
Press to reset the counter to 00000.
14. DISPLAY button
Press to display the Main menu. Press again to show the
time display.
15. POSITION/VERTICAL ADJUST buttons (+/-)
• Pressing the (+) button moves the day and time display
to the right. Pressing the (-) button moves the day and
time display down the screen. The display cannot be
adjusted if a warning is displayed.
• Pressing either button minimizes vertical jitter in the still
mode or during fast playback. Refer to Section 9.4.3 for
details.
16. TRACKING buttons (+/-)
Press these buttons if noise is present during playback, re-
verse playback, or slow playback.
17. PICTURE control
Use this control to adjust picture quality between soft and
sharp.
18. VIDEO switch
Use the switch to select color or black and white recording
and playback.
REW
FF
JOG/ADJUST
CLEAR/ ENTER/
SHUTTLE
REC
STOP
PLAY
POWER
EJECT
PICTURE
TRACKING
POSITION/
VERTICAL
ADJUST
REC/PLAY
MODE
COUNTER
RESET
COUNTER MEMORY/
SKIP/INDEX
PAUSE/
SHUTTLE HOLD
DISPLAY
TIMER REC
VIDEO
SOFT
SHARP
COLOR
B/W
Fluorescent display
Figure 3. Front View