


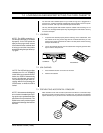

Pelco Manual C650M (12/98) 31
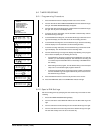
8.2 TIMER RECORDING
8.2.1 Programming Procedure
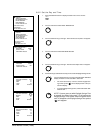
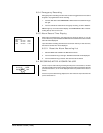
1. Press the DISPLAY button to display the Main menu on the monitor.
2. Turn the JOG dial to select TIMER PROGRAM and turn the SHUTTLE ring to
the right. The TIMER PROGRAM display will appear.
3. Turn the JOG dial to select the program number and turn the SHUTTLE ring to
the right. The day of the week display flashes.
4. To set the day of the week (DW), turn the JOG dial to select the day and turn
the SHUTTLE ring to the right.
5. To set the START recording time, turn the SHUTTLE ring to select the record-
ing start time display. Turn the JOG dial to set the recording start time.
6. To set the END recording time, turn the SHUTTLE ring to select the recording
end time display. Turn the JOG dial to set the recording end time.
7. To set the recording mode (HR), turn the SHUTTLE ring to select the record-
ing mode display. Turn the JOG dial to set the recording mode.
8. Turn the SHUTTLE ring to the right. The display stops flashing. If the program
has not been completely set, the flashing will not stop.
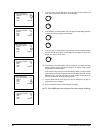
• If the END time is the same or earlier than the START time, the next day
indicator (•) is automatically displayed. This indicates the recording will
run continuously from the START time on the first day to the END time on
the next day.
• When setting another program, turn the SHUTTLE ring to set and repeat
steps 3-8. You can schedule eight programs maximum.
• To erase the program setting, select the program number to be erased.
Turn the SHUTTLE ring to the right to flash the day of the week, then turn
the SHUTTLE ring to the left.
9. Press the DISPLAY button to show the day and time on the monitor.
10. Press the TIMER REC button. The TIMER REC indicator will light.
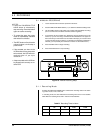
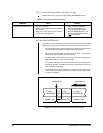
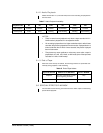
<MAIN MENU >
DISPLAY
TIMER PROGRAM
RECORDING SET UP
REAR TERMINAL
MAINTENANCE
FIRST TIME SET UP
Use JOG to select,
and ENTER.
Press DISPLAY to exit.
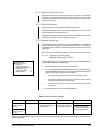
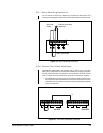
DW START END HR
1 SPL 08 : 40 17 : 10 L12
- - - - - : - - - - : - - - - -
DW START END HR
1 SPL 08 : 40 17 : 10 L12
SAT - - : - - - - : - - - - -
DW START END HR
1 SPL 08 : 40 17 : 10 L12
SAT - - : - - - - : - - - - -
DW START END HR
1 SPL 08 : 40 17 : 10 L12
SAT 08 : 00 - - : - - - - -
DW START END HR
1 SPL 08 : 40 17 : 10 L12
SAT 08 : 40 - - : - - - - -
DW START END HR
1 SPL 08 : 40 17 : 10 L12
SAT 08 : 40 12 : 00 - - -
DW START END HR
1 SPL 08 : 40 17 : 10 L12
SAT 08 : 40 12 : 00 - - -
DW START END HR
1 SPL 08 : 40 17 : 10 L12
SAT 08 : 40 12 : 00 L24
<
TIMER PROGRAM
>
DW START END HR
SPL 08 : 40 17 : 10 L12
2 - - - - - : - - - - : - - - - -
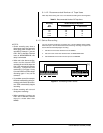
8.2.2 Special DW Settings
Set the recording period by specifying the start and end day of the week for timer
recording.
1. Access the TIMER PROGRAM setting display.
2. Turn the JOG dial to select SPECIAL DW and turn the SHUTTLE ring to the
right.
3. Turn the JOG dial to set the start day and turn the SHUTTLE ring to the right.
4. Turn the JOG dial to set the end day and turn the SHUTTLE ring to the right.
The start and end day cannot be set to the same day.