


MCX-2000 Owner’s Manual
87
Operating a Client Remotely
Once you’ve created a MusicCAST network, each
MusicCAST client becomes able to access the MCX-2000
and share most audio sources on the server, including the
music archive, FM radio stations and audio signals from
external inputs. In fact, each client automatically retrieves the
latest catalog of songs, artists, albums, genres and radio
stations, and lets you initiate audio streaming by selecting an
audio source on the client side (client request).
You can also initiate audio streaming to each client from the
server side. Besides the Broadcast feature that streams a
single audio source selected on the MCX-2000 to one or
more clients at the same time (page 89), you can even issue
a client request on the server side—using one of the Client
Control functions. It’s another value of the MCX-2000 as the
center controller in your MusicCAST network. This section
describes how you can manage your MusicCAST clients
remotely.
n For more information on how to stream audio to your clients, based
on the client request, see the manual that came with your MusicCAST
client.
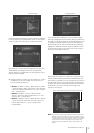
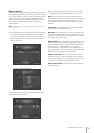
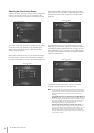
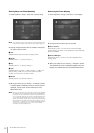
1 Select Top Menu > Client Control for the following screen.
1 Client name
2 Activity
3 Network connection
This client list screen lets you view the current status of each
registered client. While checking each client status, you can
remotely control general client activities using the Submenu
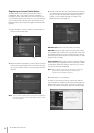
commands in this screen. Move the selection (highlight) to
one of registered clients, and select a Submenu command
you want to use:
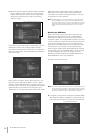
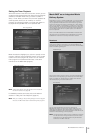
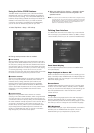
View Play Info: Shows the Play Information screen for the
selected client. If the audio source selected on the client is a
song from the MCX-2000 music archive, you can further add
or remove the bookmark using the Submenu > Bookmark
command in the Play Information screen as using the
BOOKMARK button on the client remote control.
Playback: Lets you start or stop playback of the audio
source currently playing on the selected client.
Timer: Lets you turn on or off the timer playback feature
(page 89) on the selected client.
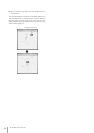
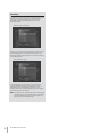
Power:
Lets you turn on or off the selected client, or change
its power mode. If you select Sleep, the client enters sleep
mode showing “Remote Sleep” (forced sleep mode by the
MCX-2000 operation). You can awake the client by pressing
its controller button if it’s not locked (see Lock).
Lock: Use this to prevent operations on the selected client.
With ON, the client only accepts volume control with the VOL
–/+ and MUTE buttons, time display (when the MENU button
is double clicked for the current time) and stop playback of
what’s being played (you cannot resume playback). This
function is useful if your client is in a public place.
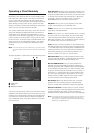
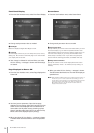
Edit Client title: Lets you edit the selected client’s name
using the character palette or a PS/2 keyboard connected to
the MCX-2000 (page 75). Read the following note.
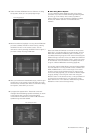
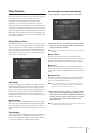
Receive PCM Stream: Lets you specify whether the
selected client prioritizes PCM song data for playback of
archived songs. With ON, the MCX-2000 streams PCM data
for the selected archived song to the client. However, PCM
songs can simultaneously be streamed to up to 3 clients—3
wired clients, or 2 wired clients plus a single wireless client.
So, even if you’ve enabled this parameter for two or more
wireless clients, the MCX-2000 will stream songs in MP3
format to the second and following wired clients.
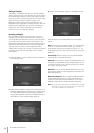
Recall Play: Makes the selected client start ‘continued’
playback of a song currently playing on the MCX-2000
server or another client specified in a dialog box (page 90).
Control all Clients: Provides options to control all clients
at a time—starting or stopping playback of the audio source
currently selected at each client, as well as enabling or
disabling the timer playback feature on each client (page 89).
n If you arrange the client list using the Change Client order command
from the Submenu in the Manual Configuration screen (page 43),
client names you specified with the above Edit Client title command
will be reset to the default (Client #).
1
2 3
Client list screen