


S E T U P M E N U O P T I O N S
56
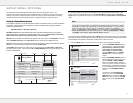
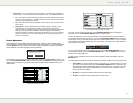
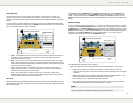
Picture Adjustment Menu for HDMI 2 & Analog
To change a picture adjustment parameter, use the UP/DOWN ARROW buttons to highlight the
parameter, and use the LEFT/RIGHT ARROW buttons to change its value.
To aid in the adjustment of picture control parameters, the picture adjustment menu will be reduced to
only show the parameter being adjusted once you press the LEFT/RIGHT ARROW buttons (except the
Picture Mode, which you will directly see the mode name switches between Mode 1, 2 and 3, and all the
other parameters are adjusted automatically to the stored value). The reduced menu will be positioned
near the bottom of the screen.
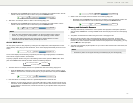
Brightness 0 -16 +16
You can continue adjusting the current parameter by pressing the LEFT/RIGHT ARROW buttons. To
select another parameter, press the UP/DOWN ARROW buttons. Press the ENTER button to return to
the large Picture Adjustment menu.
To exit the Picture Adjustment menu and return to the Setup Menu, either select “Exit” or press the
RETURN button.
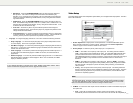
The following picture adjustment controls are available for all HDMI 1, HDMI 2 and Analog (Component):
1. Picture Mode: To use the customized picture mode saved by you.
The BD32 allows you to save
up to three (3) customized modes. Press the LEFT/RIGHT ARROW buttons to switch the mode
and all parameters will be automatically adjusted to their stored values. Changes to the current
parameter values will be stored automatically when you exit the Picture Adjustment screen or
switch to another Picture Mode.
2. Brightness: To adjust the brightness (black level) of the video output.
3. Contrast: To adjust the contrast (white level) of the video output.
NOTE
Proper brightness and contrast settings are necessary for a quality video output. If you do not
have the correct black and white levels, your images can appear washed out or can lose
detail in shadows when watching darker scenes. Televisions have brightness (black level)
and contrast (white level) controls; however it may require a combination of tweaking both the
player and your television to get the optimal result. We recommend using a calibration disc
such as the Spears & Munsil™ High Definition Benchmark Blu-ray Edition or Digital Video
Essentials HD Basics as aids for adjusting. First adjust the television’s picture controls for
S E T U P M E N U O P T I O N S
55
x SAP Mark (on/off) – To turn on/off the display of a Secondary Audio Program mark when a
Blu-ray Disc with secondary video and audio is played. Keeping the SAP mark off avoids
distraction from normal movie watching.
x Screen Saver – To turn on/off the screen saver function. The screen saver is designed to
minimize burn-in concerns for plasma and CRT display devices. The available options are:
x On – After about 3 minutes of inactivity, the player will show an animated Primare logo
moving on a black background. This allows most areas of the screen to rest and gives
all areas an equal opportunity to refresh.
x Off – The screen saver will not be activated. Use this option if your TV does not have a
burn-in issue.
x Energy Saver – Video output will be turned off after 3 minutes of inactivity. Many
projectors and LCD TVs will go into a standby or sleep mode and turn off their
projection lamp or LCD backlight lamp, thus saving energy and prolonging the lamp life.
When you press any button on the remote control or the player’s front panel, the
screen saver will be canceled and video output will be restored. If your TV is already in
standby or sleep mode, you may need to wake up the TV by pressing a button on its
remote or control panel.
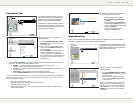
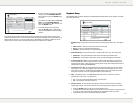
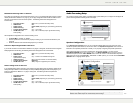
Picture Adjustment
Picture Adjustment is a special section of the Video Setup menu. It allows you to fine tune many picture
control parameters in order to achieve the optimal picture quality and visual result. To use Picture Adjustment,
press the SETUP button on the remote control to enter the player’s Setup Menu and choose “Video Setup” –
“Picture Adjustment”, then select the primary video output terminal:
Picture Adjustment
Please select your video output
HDMI 1
HDMI 2 & Analog
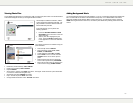
For information on how to choose your primary video output, please refer to Primary Output on page 21. You
ca
n use the LEFT/RIGHT ARROW to select your choice, then press the ENTER button to bring up the Picture
Adjustment menu. Depending on your primary video output, the detailed Picture Adjustment menu can be
slightly different:
Picture Adjustment Menu for HDMI 1