S E T U P M E N U O P T I O N S
65
Multi-Channel Analog Audio to Receiver
If the player is connected to an A/V receiver through the 7.1ch or 5.1ch analog audio jacks using 8 or 6 RCA
cables (as described in “Method 5” on page
3), you can play all supported audio formats and listen to them
with your A/V receiver and
surround sound systems. The following audio format setup options are
recommended:
o Secondary Audio: Off (or On if you need secondary audio)
o HDMI Audio: Off
o SACD Output: PCM or DSD (depending on your listening preference)
o HDCD Decoding: On
o Coaxial Optical Output: (any – not in use)
o LPCM Rate Limit: (any – set to 192k may help to get the best analog
audio quality)
Also set Speaker Configuration in the “Audio Processing” menu:
x Set Down Mix to “7.1Ch” or “5.1Ch”.
x Set the speaker size and subwoofer properly according to your actual audio hardware. (see
page
28)
x
Enable or select the multi-channel analog inputs on your receiver
Coaxial or Optical Digital
Audio to Receiver
If your audio connection is as described in “Method 6” on page 4 of this guide, and the A/V receiver supports
Dol
by Digital and DTS decoding, the following audio format setup options are recommended:
o Secondary Audio: Off (or On if you need secondary audio)
o HDMI Audio: Off
o SACD Output: (any – SACD is not available through the
optical/coaxial output)
o HDCD Decoding: On (or Off if the receiver can decode HDCD)
o Coaxial Optical Output: Bitstream
o LPCM Rate Limit: 48k (or higher if supported by the receiver)
Stereo Analog Audio to Receiver
If you prima
rily listen to stereo contents or your receiver only offers stereo audio connections, please use the
analog RCA-style cables to connect the FL (Front Left) and FR (Front Right) terminals of the player to your
receiver, as described in “Method 7” on page 4 of this guide. The following audio format options are
re
commended:
o Secondary Audio: Off (or On if you need secondary audio)
o HDMI Audio: Off
o SACD Output: PCM or DSD (depending on your listening preference)
o HDCD Decoding: On
o Coaxial Optical Output: (any – not in use)
o LPCM Rate Limit: (any – set to 192k may help to get the best analog
audio quality)
S E T U P M E N U O P T I O N S
66
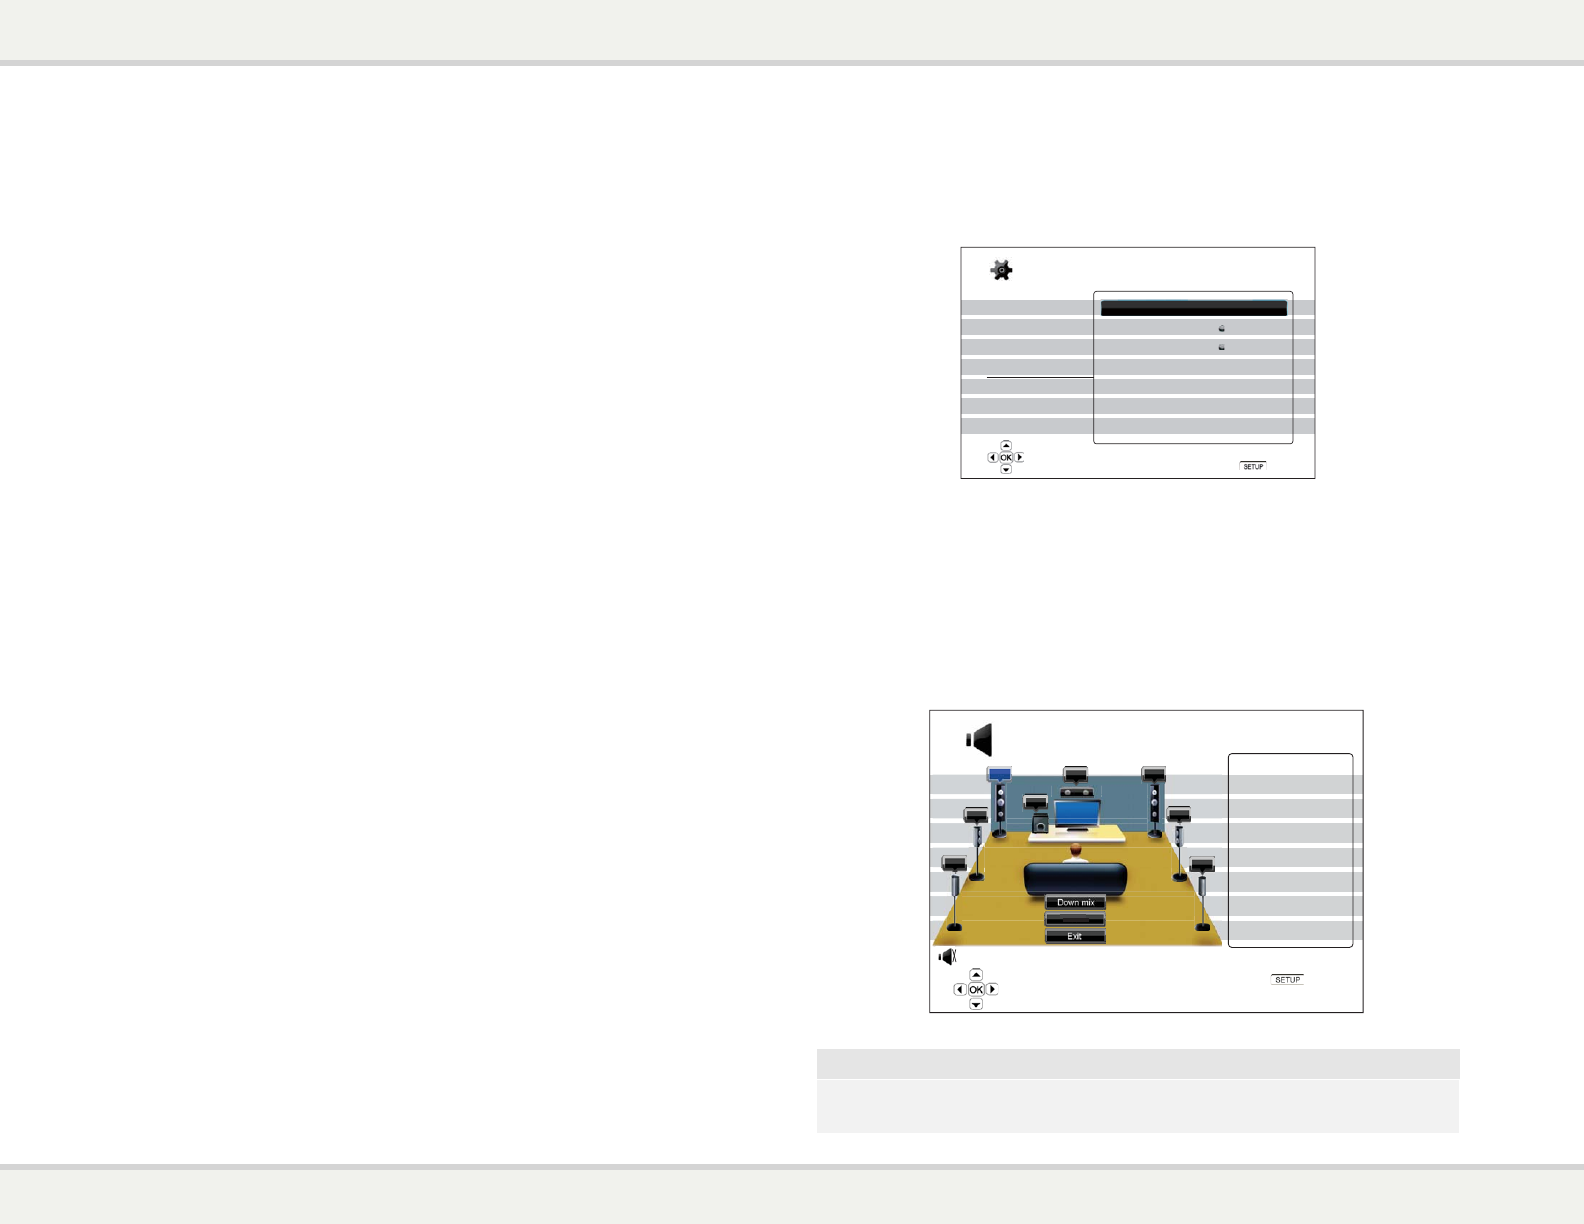
Audio Processing Setup
The “Audio Processing Setup” section of the Setup Menu system allows you to configure how the player will
process audio signals before sending them to the output.
Playback Setup
Video Setup
Audio Format Setup
Audio Processing
Device Setup
Network Setup
Exit
Speaker Configuration
Dynamic Range Control
Crossover Frequency
80Hz
Auto
Setup Menu
Exit
Configure speaker arrangement for the analog audio output
Speaker Configuration
In the Speaker Configuration menu you can configure speaker settings such as down-mix mode,
number of speakers, their distance, size and trim level. The Speaker Configuration menu shows an
illustration of the speaker placements to assist you on properly configuring the speaker parameters.
Upon entering this menu, the cursor is positioned on the front left speaker. You may use the
LEFT/RIGHT ARROW buttons to move the cursor. The RIGHT ARROW button moves the cursor in
clockwise sequence, and the LEFT ARROW button moves the cursor in counterclockwise sequence.
When the cursor is over the “Down Mix”, “Test Tone” or “Exit” options, you can also use the UP/DOWN
ARROW button to highlight these options.
FL
SW
C
FR
SR
SBR
SBL
SL
Test Tone
Size: Large
Distance: 12ft
Trim: 0.0dB
Next Speaker
Exit
Speaker Configuration
Exit
Configure the front left speaker
Down Mix Mode: 7.1Ch
Front Left Speaker
Test Tone : Off
NOTE
S E T U P M E N U O P T I O N S
67
Speaker Configuration applies to the multi-channel analog audio outputs only. All digital
bitstream and LPCM outputs are unaffected by these settings.
Down Mix Mode
Down mix is the process of converting multi-channel audio to a lesser number of channels. For
example, converting a 5.1ch source to stereo or converting a 7.1ch source to 5.1ch. Down mixing
allows the audio output from the player to match the exact number of speakers available in your home
theater.
The current down mix mode is displayed in the lower right corner of the speaker placement illustration.
To change the audio down mix setting, press the ENTER button while the cursor is over the “Down Mix”
option. The following down mix modes are available:
FL
SW
C
FR
SR
SBR
SBL
SL
LT/RT
Stereo
5.1Ch
7.1Ch
Speaker Configuration
Exit
Choose down mix mode
Down Mix Mode: 7.1Ch
Down Mix
Test Tone : Off
x LT/RT – Left Total/Right Total. The center and surround channels are mixed into the two front
channels according to the LT/RT matrix. A Dolby Pro Logic receiver will decode the two-
channel audio into surround audio.
x Stereo - This mode down-mixes multi-channel audio to 2-channel stereo output. For original
stereo content the output will not change. For original multi-channel content the surround and
center channels will be mixed with the left and right front channels. Recommended for use with
TV sets or stereo receiver/amplifiers.
x 5.1Ch – This mode enables 5.1ch decoded audio output. The number of actual output
channels depends on the disc. If the source content has more channels, the surround back
channels will be mixed into the surround channels.
x 7.1Ch – This mode enables 7.1ch decoded audio output. The number of actual output
channels depends on the disc. For 6.1ch contents, the left and right surround back speakers
will both output the same surround back audio channel.
Test Tone
Te
st tone is a special group of artificially-created sounds that are used to test your audio speaker system and
help to identify any wiring faults. By default the Test Tone is set to “Off”, with the status displayed in the lower
left corner of the screen.


