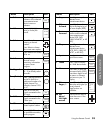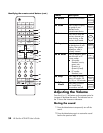
Using the Remote Control
Using the Remote Control 37
Operating an i.LINK
device
1 Connect an i.LINK device to the TV. For
information on connecting an i.LINK device, see
“Connecting an i.LINK device” on page 19.
2 Press the i.LINK button on the remote control to
open the i.LINK control panel.
3 Use the arrow buttons on the remote control to
highlight a function and press Select.
Or
Use the Record, Stop, Rewind, Fast-Forward, Pause,
and Play buttons to operate the i.LINK device.
4 Press the i.LINK button to hide the i.LINK control
panel.
About i.LINK
i.LINK is an interface connection using a serial transfer
system that transfers multimedia data, such as digital
images and digital sound, between devices that have
i.LINK terminals.
i.LINK is a term defined in the IEEE 1394 (Institute of
Electrical and Electronics Engineer) standard.
Currently, the transfer speeds are at 100 Mbps, 200
Mbps, and 400 Mbps, each of them expressed as
S100, S200, and S400 respectively. The maximum
speed for this TV is 400 Mbps.
i.LINK devices that can be connected
Only D-VHS decks, AV HDD recorders, and Blu-ray
Disc recorders can be connected to this TV with i.LINK.
Device recognition, control, recording, and playback
operations may not be possible on some devices.
Other devices such as DVD recorders, digital video
cameras, PCs, or PC peripheral devices do not meet
the specifications for this TV and cannot be connected
with i.LINK.
Materials that can be recorded with
i.LINK
Only digital programs can be recorded by i.LINK
devices connected to this TV using i.LINK. i.LINK
recording is not compatible with analog broadcasts or
external input signals (Inputs 1 through 5).
Setting the recording mode
(i.LINK)
The function for automatically adjusting the recording
mode of connected i.LINK devices can be turned on or
off. Most of the currently available i.LINK devices
automatically recognize the transfer rates of the
pictures and sound being recorded. These devices
control the recording mode accordingly. Set this Mode
to Pass through in normal circumstances.
Depending on the i.LINK devices used and the type of
broadcast being recorded, this TV may not adjust the
recording mode properly. In this case, set the
recording mode to Pass through.
1 Press the Menu button on the remote and the menu
screen displays.
2 Press the up arrow and down arrow buttons on the
remote control to highlight Digital Setup, and
press Select.
3 Press the up arrow and down arrow buttons on the
remote control to highlight i.LINK Setup, and
then press Select.
4 Press the up arrow and down arrow buttons on the
remote control to highlight Recording Mode,
and then press Select.
5 Press the left arrow and right arrow buttons on the
remote control to select Auto or Pass through,
and then press Select.
Normally, this should be set to Pass through.
6 Press the Menu button to view the display.
Setting the standby mode
(i.LINK)
Power consumption during standby mode can be
minimized by changing the setting of the Standby
Mode in i.LINK Setup. When i.LINK is not in use, select
Inactive in Standby Mode.
1 Press the Menu button on the remote control, and
the menu screen displays.
2 Press the up arrow and down arrow buttons on the
remote control to highlight Digital Setup, and
press Select.


