


KRAMER: SIMPLE CREATIVE TECHNOLOGY
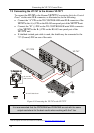
Operating the VP-747
26
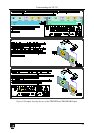
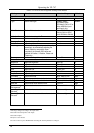
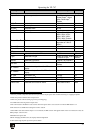
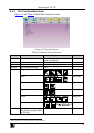
Table 5: Preview and Program Setting OSD Menus
Setting Function Selection/Range Default
Input Sub-menu
Source Select the input source Channel 1 to 8 Channel 1
Type Set the video type RGBHV, RGBS
(PC/Video), RGsB
(PC/Video), YCbCr, Y/C or
video, HDMI (for input 1
and input 2 only)
RGBHV
Video Standard Set the Video standard Auto, NTSC, PAL,
PAL-M, PAL-N, NTSC
4.43, SECAM or PAL 60
Auto
H-Position
1
Set the horizontal position
2
V-Position
1
Set the vertical position
Frequency
1
Adjust the frequency
3
Phase
4
Adjust the phase 0 to 31 0
Auto Image Assesses the image and improves the quality
accordingly, by automatically adjusting the
phase, frequency and position. Upon
completion, the relevant OSD values are
updated (H-Position, V-Position, Phase and
Frequency)
Overscan Allows stretching of the outputted picture On or Off On
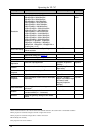
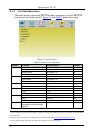
Picture Sub-menu
Brightness Adjust the brightness -50 to 50 0
Contrast Adjust the contrast -50 to 50 0
Color Adjust the color -50 to 50 0
Hue Adjust the hue -180 to 180 0
Sharpness Adjust the sharpness -50 to 50 0
Output Gamma Adjust the gamma 1 to 4 1
Film Mode Set the film mode Auto, Video or Film Auto
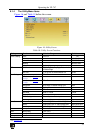
Temporal NR
5
Set the temporal noise reduction level Off, Low, Medium or High High
Mosquito NR
5
Set the Mosquito noise reduction level Off, Low, Medium, High Low
Block NR
5
Set the block noise reduction level: Off or On High
Detail
Enhancement
5
Set the detail enhancement Off, Low, Medium or High Off
Luma Transition
Enhance
5
Set the luminance transition enhance level: Off, Low or High Low
Chroma Transition
Enhance
5
Set the chrominance transition enhance level: Off, Low or High Low
1 The range changes according to the input mode
2 For UXGA and component video inputs
3 For UXGA inputs
4 Only for a VGA Source
5 You do not have to press ENTER after selecting the desired parameter to change it