


22
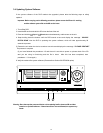
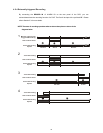
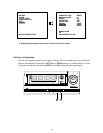
4.3.2 Slow Forward/Reverse
There are 4 speeds available for a slow playback: 1/2, 1/4, 1/8, 1/16. While playing back recorded video
at the recorded speed:
(1) Press the PAUSE button for the slow playback mode.
(2) Forward: Turn the Shuttle dial clockwise to view the recorded video in the forward direction
at a speed slower than the recorded speed. Each subsequent turn of the shuttle to the right
increases the forward rate, as 1/2, 1/4, 1/8, and 1/16.
(3) Reverse: Turn the Shuttle dial counterclockwise to view the recorded video in the reverse
direction at a speed slower than the recorded speed. Each subsequent turn of the shuttle to the
left increases the reverse rate, as -1/2, -1/4, -1/8, and -1/16.
(4) Normal: Release the Shuttle dial and then press the PLAY button to return to the
normal speed of playback.
* You can also operate by using “<” button and “>” button .
4.3.3 Play Back Picture-by-Picture
While playing back recorded video at the recorded speed:
(1) Press the PAUSE button for the picture-by-picture mode.
(2) There are two ways, by PAUSE button or by JOG, available to play in the picture-by-picture
mode, but the PAUSE button can only function in a forward direction; the other, JOG dial
, can act in both a forward and a backward direction, as well as picture-by-picture.
By PAUSE button :
Press the PAUSE button to display one frame/field of a picture at a time in the
forward direction. (When playing back video recorded by a multiplexer, each
sequential press of the PAUSE button will display each camera in sequence.)
By JOG dial :
Turn the JOG dial clockwise to display one frame/field of a picture at a time in the
forward direction. Turn the JOG dial counterclockwise to display one frame/field of a
picture at a time in the backward direction.
(3) Press the PLAY button to return to the normal speed of playback.
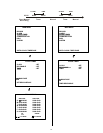
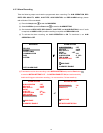
4.3.4 Play Back Recorded Video from an HDD in the Mobile Rack
To play back a recorded video from HD 2, take the following steps:
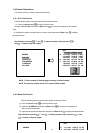
(1) Press the Setup button to enter the setup menu.
(2) Select DISK and press the Enter button to enter the DISK SETTING page.
(3) Set the HD2 USAGE to REC and then exit the setup menu.
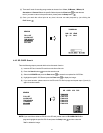
(4) Use the search function to access desired recorded video. For specific operation details please
refer to Section 4.4 (Search Operations ).