C695M-B (11/03) 25
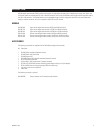
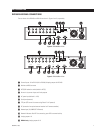
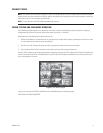
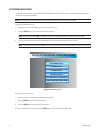
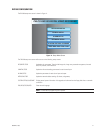
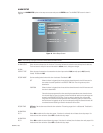
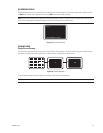
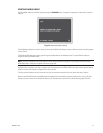
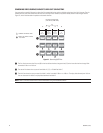
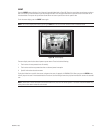
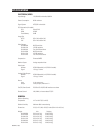
Figure 13. Camera Setup Screen
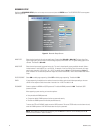
CAMERA NAME Label the channel with an alphanumeric name (up to 15 characters). The channel name and other information
appear on the monitor when the channel is selected.
NOTE: When sequencing in LIVE VIEW mode, the on-screen display (OSD) is not redisplayed until the unit
sequences again.
Press the OSD button to toggle the channel name on and off. The OSD button is active in LIVE VIEW and PTZ
modes and also when sequencing in LIVE VIEW mode (refer to the
Operation
section in this manual).
NOTE: When the 3x3 screen format is selected, the DX3100 only displays the first 11 characters of each channel
name. When the 4x4 screen format is selected, the DX3116 only displays the first seven characters of each channel
name.
RECORD Enable or disable recording for each individual channel. Select and choose between ON or OFF. Channels with
record off are not included in calculations for total shared image rate of recorded channels. For each channel that is
set to record OFF, there is a related increase in the individual image rate for channels with record ON.
RECORD
PARAMETERS Determine the recording parameters. Select either DEFAULT or MANUAL. If DEFAULT is chosen, all record
parameters will be set to default values. If MANUAL set is chosen, all record parameters can be adjusted.
RECORD TIME Specify the time span for recording this channel if record ON is selected (refer to
Record
above). This setting indicates the recording start and stop time for each day. The time format
is always 24-hour and the default is 0 to 24, that is, midnight to midnight.
IMAGE QUALITY Specify the general image quality in increments of 10 on a scale of 0 (minimum) to 100
(maximum). The default is 70.
This setting affects the size of each recorded image. Higher settings result in larger image
sizes and reduced recording capacity. Lower settings result in smaller image sizes and
increased recording capacity. Select a quality that meets the needs of your installation.
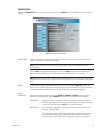
CAMERA SETUP
Highlight the CAMERA SETUP option on the setup menu screen and press the ENTER button. The CAMERA SETUP screen is shown in
Figure 13.
CAMERA SETUP
CH 3
CH 2
CH 4
CH 6
CH 5
CH 7
CH 8
CH 9
CH 10
CH 11
CH 12
CH 13
CH 14
CH 15
CH 16
CH 1
RECORD (24 HR)
RECORD PARAMETER
BRIGHTNESS
CONTRAST
HUE
RECORD TIME (24 HR)
IMAGE QUALITY
MOTION SENSITIVTY
PTZ RX ADDRESS
CAMERA NAME
:
:
:
:
:
:
:
:
:
:
100=Best
to
(00-99)
CHROMA-U:
CHROMA-V:
70
0
50
0
24
100
50
50
50
50
ON
CH1
DEFAULT MANUAL