


6
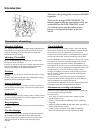
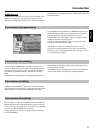
The remote control
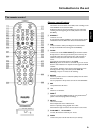
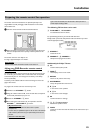
Remote control buttons
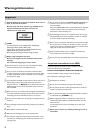
1 REC/OTR n
Record the current TV show on the HDD, mark recordings in the
Time Shift Buffer to be stored on HDD.
Hold button down to start the recording from now. (Mark the
recording from the beginning of the actual position in the Time
Shift Buffer).
2 STANDBY m
Switch set on or off.
A programmed recording (TIMER) or an archiving process will be
continued until the end, before the device will be switched off.
3 CAM
Switch to 'Camera mode' (recording from the front sockets
directly on the HDD and not through Time Shift Buffer).
4 TV/HDD
Switches scart socket EXT2 AUX-I/O
M of the DVD recorder
directly to the TV. This lets you watch the picture from any unit
connected to this scart socket (set-top box, video recorder or
satellite receiver) and at the same time record from another
source.
If you have not connected a device to the EXT2
AUX-I/O
M socket or the device is switched off, you can use this
button to switch between TV reception and the signal of the DVD
recorder.
This, however, functions only if you have connected your TV to
the DVD recorder using a scart cable (socket EXT1 TO
TV-I/O
N ) and your TV reacts to the switching.
5 RETURN
Return to previous menu on a video CD (VCD). This also works
with some DVD discs.
You can jump back to the previous scene of the Time Shift Buffer.
6 EDIT
Call up/Cancel the edit menu.
[ •TV
Button for TV functions.
7 TIMER s
Program a recording (TIMER) manually or using the ShowView
®
system or alter/clear programmed recordings.
8 SELECT
Select function/value.
Select multiple titles in the media browser.
Switch on repeat play during playback from a disc.
Switch between upper and lower case characters in text entries.
9 TV VOLUME q , TV VOLUME r
Increase, decrease the volume of your TV-set.
0 TUNER
Switch to live picture of the internal tuner (TV channel).
ENGLISH
Introduction to the set