


56
3 The following options are available:
O Freely selectable end:
- Press REC/OTR n
1 to select the entire title. The colour
changes to red.
- Search for the desired end using D
K , C M .
- Hold down the red button
D :
Red marked recording changes to its original colour from
the current position to the end of the title.
If you want to set more markers in one title, start marking at
the begin of the title.
O Freely selectable beginning:
- Search for the desired beginning using D
K , C M .
- Hold down the REC/OTR n
1 button.
The marker changes to red from the current position to the
end of the title.
O Freely selectable beginning and end:
First, you must define the beginning and then cut off the end.
- Search for the desired beginning using D
K , C M .
- Hold down the REC/OTR n
1 button.
The marker changes to red from the current position to the
end of the title.
- Search for the desired end using D
K , C M .
- Hold down the red button:
Red marker changes to its original colour from the current
position to the end of the title.
How can I delete the changes?
Press REC/OTR n
1 to mark the entire title.
To remove the marker, press the red function button
D .
Recording from a camcorder connected to the front sockets
Using this function, you can store recordings via the front sockets
directly on the HDD where you can edit them easily. Then you can
transfer (archive) them in high speed on a DVD+RW, DVD+R disc.
How you archive recordings on a DVD+RW, DVD+R you will read in
the section 'Archiving (storing) titles on a DVD+RW, DVD+R'.
Please observe the following:
•)
Any programmed recordings (TIMER) will not be carried out during
this operating mode.
•)
If there are any recordings in the Time Shift Buffer, they will be
deleted. Therefore, store important recordings on the HDD
( REC/OTR n
1 ). For more information, read the chapter 'The
Time Shift Buffer'.
Preparation:
•
Select the recording mode (button TUNER 0 , button SYSTEM
MENU
A ,'Preferences', button C M 'Camera mode') .
1 Connect the camcorder as described in the chapter ' Connecting
additonal devices/Connect camcorder to the front sockets'.
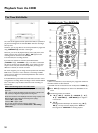
2 Press CAM
3 on the remote control.
P The DVD recorder will switch to camcorder mode.
3 Select the socket to which the camcorder is connected using
CHANNEL q
P , CHANNEL r S .
O 'CAM1'
For recordings from the VIDEO (CAM1)
D , S-VIDEO
(CAM1)
C sockets.
Switching between the two sockets is done automatically. If a
signal is available at both sockets at the same time, the signal at
the S-VIDEO (CAM1)
C socket has priority. If you change
socket (unplug), you must re-select the socket using
CHANNEL q
P (press twice).
O 'CAM2'
For recordings from the DV IN (CAM2)
F socket.
4 Press REC/OTR n
1 to start the recording.
P The red light around the record button n 0 on the front is
switched on.
a The red light around the record button n 0 is flashing
b If no signal is available, no recording will be made or the recording in
progress will be stopped.
b During the playback of a recorded 'copy protected' signal you will see
only that parts of the recording where no copy protection can be
recognised.
5 You can stop the recording using the following buttons:
ENGLISH
Recording on the HDD