


15
User manual
ENGLISH
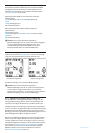
D Note: When voice-activated recording is enabled, the voice
activation recording (sensitivity) level can be adjusted during
recording by using the + or - buttons. A triangle at the volume
level meter indicates the threshold value.
E Tip: The performance of the voice-activated recording feature
depends largely on the microphone sensitivity setting and the
noise level of the environment. See Adjust microphone sensitivity
on page 15 for more information.
6.4 Adjust LCD backlighting
The LCD screen of the Digital Pocket Memo can be backlit while
dictating in a poorly illuminated environment. The backlight
consumes more power, so it can disabled when it is not necessary.
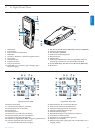
1 The 4-position slide switch (12) must be in the STOP position.
2 Press the MENU button to open the menu.
3 Press the + or - buttons (5) to highlight the SETUP menu item
and press the ENTER smart button.
4 Press the + or - buttons to highlight the BACKLIGHT menu item
and press the ENTER smart button.
5 Press the + or - buttons to select the your preference (OFF, 8
SEC ON, 20 SEC ON).
6 Press the OK smart button (2a) to save the setting or press the
CANCEL smart button (2b) leave the setting unchanged.
7 Press the BACK smart button (2a) twice to exit the menu.
6.5 Enable/disable the record lamp
When enabled, the status LED/record lamp shines red (overwrite
mode) or green (insert mode) during recording.
Follow these steps to disable the record lamp:
1 The 4-position slide switch (12) must be in the STOP position.
2 Press the MENU button to open the menu.
3 Press the + or - buttons (5) to highlight the SETUP menu item
and press the ENTER smart button.
4 Press the + or - buttons to highlight the RECORD LAMP menu
item and press the ENTER smart button.
5 Press the + or - buttons to select the your preference (ON,
OFF).
6 Press the OK smart button (2a) to save the setting or press the
CANCEL smart button (2b) leave the setting unchanged.
7 Press the BACK smart button (2a) twice to exit the menu.
6.6 Adjust LCD contrast
The contrast of the LCD screen can be adjusted for the level of light
in your environment and your viewing preferences.
1 The 4-position slide switch (12) must be in the STOP position.
2 Press the MENU button to open the menu.
3 Press the + or - buttons (5) to highlight the SETUP menu item
and press the ENTER smart button.
4 Press the + or - buttons to highlight the CONTRAST menu item
and press the ENTER smart button.
5 Press the + or - buttons to adjust the contrast.
6 Press the OK smart button (2a) to save the contrast setting
or press the CANCEL smart button (2b) to leave the setting
unchanged.
7 Press the BACK smart button (2a) twice to exit the menu.
6.7 Adjust microphone sensitivity
Set the microphone sensitivity for the environment and your
dictation preferences. Consider these factors:
What is your voice level while dictating?
How far is the microphone from your mouth?
How noisy is the environment?
1 The 4-position slide switch (12) must be in the STOP position.
2 Press the MENU button to open the menu.
3 Press the + or - buttons (5) to highlight the SETUP menu item
and press the ENTER smart button.
4 Press the + or - buttons to highlight the MICROPHONE menu
item and press the ENTER smart button.
5 Press the + or - buttons to select the your preference
(DICTATE, PRIVATE, CONFERENCE).
6 Press the OK smart button (2a) to save the setting or press the
CANCEL smart button (2b) to leave the setting unchanged.
7 Press the BACK smart button (2a) twice to exit the menu.
6.8 Change sound feedback
The Digital Pocket Memo can be set to give sound feedback (beeps)
when:
the end of the file is reached during playback
an index mark is hit during fast forward or fast rewind
the battery level drops below 10%
available memory drops below two minutes
a command cannot be carried out, or
a barcode is scanned (with the optional barcode module).
To change this setting:
1 The 4-position slide switch (12) must be in the STOP position.
2 Press the MENU button to open the menu.
3 Press the + or - buttons (5) to highlight the SETUP menu item
and press the ENTER smart button.
4 Press the + or - buttons to highlight the DEVICE BEEP menu
item and press the ENTER smart button.
5 Press the + or - buttons to enable (ON) or disable (OFF) sound
feedback.
6 Press the OK smart button (2a) to save the setting or press the
CANCEL smart button (2b) to leave the setting unchanged.
7 Press the BACK smart button (2a) twice to exit the menu.
6.9 Change noise reduction
Activate this function when in playback mode for recordings with
significant background noise. This feature reduces the level of
interfering background noise.
1 The 4-position slide switch (12) must be in the STOP position.
2
Press the MENU button to open the menu.
3 Press the + or - buttons (5) to highlight the SETUP menu item
and press the ENTER smart button.
4 Press the + or - buttons to highlight the NOISE REDUCTION
menu item and press the ENTER smart button.
5 Press the + or - buttons to enable (ON) or disable (OFF) noise
reduction.
6 Press the OK smart button (2a) to save the setting or press the
CANCEL smart button (2b) to leave the setting unchanged.
7 Press the BACK smart button (2a) twice to exit the menu.
•
•
•
•
•
•
•
•
•