


50
Playback
Chapter 3 Recording and Playback
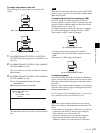
To cancel the deletion and return to the CLIP
MENU
Select “CANCEL”, and then press the SET button.
Press the RESET or MENU button.
5
Use the V/MARK1 button to select “OK”, and then
press the SET button.
The clip is deleted and you return to the thumbnail
screen.
To go to the clip deletion screen without
displaying the CLIP MENU
After step 2, press the RESET button with the SHIFT
button held down (shortcut operation).
The clip deletion screen appears directly, without
displaying the CLIP MENU.
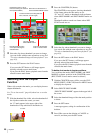
To delete all clips
1
Carry out steps 1 and 3 of “Deleting Clips” to display
the CLIP MENU.
2
Use the V/MARK1 or the v/MARK2 buttons to select
“LOCK OR DELETE ALL CLIPS”, and then press
the b/OUT button.
A sub menu appears.
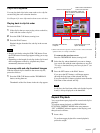
3
Select “DELETE ALL CLIPS”, and then press the
SET button.
A deletion confirmation screen appears.
4
To execute the deletion, use the V button to select
“OK”, and then press the SET button.
All clips are deleted.
However, locked clips are not deleted.
If all clips have been deleted, you return from the
thumbnail screen to the original screen.
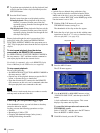
Assigning Sequence Numbers to
Thumbnails
You can assign sequence numbers to displayed
thumbnails.
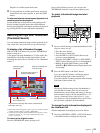
1
With the SUB CLIP button off, press the
THUMBNAIL button, turning it on.
Thumbnails of the clips on the disc appear.
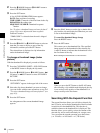
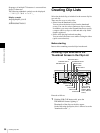
2
Press the MENU button.
The CLIP menu appears.
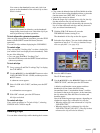
3
Use the V/MARK1 button to select “CLIP
INFORMATION”, and then press the SET button.
A sub menu appears.
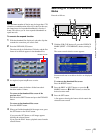
4
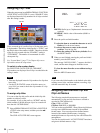
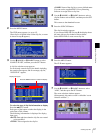
Use the v/MARK2 button to select “SEQUENCE
NUMBER”, and then press the SET button.
As shown in the following figure, sequential numbers
are assigned to thumbnails.