


60
Creating Clip Lists
Chapter 4 Scene Selection
You can use a trimming operation (see page 62) to change
In and Out points set by the quick scene selection function.
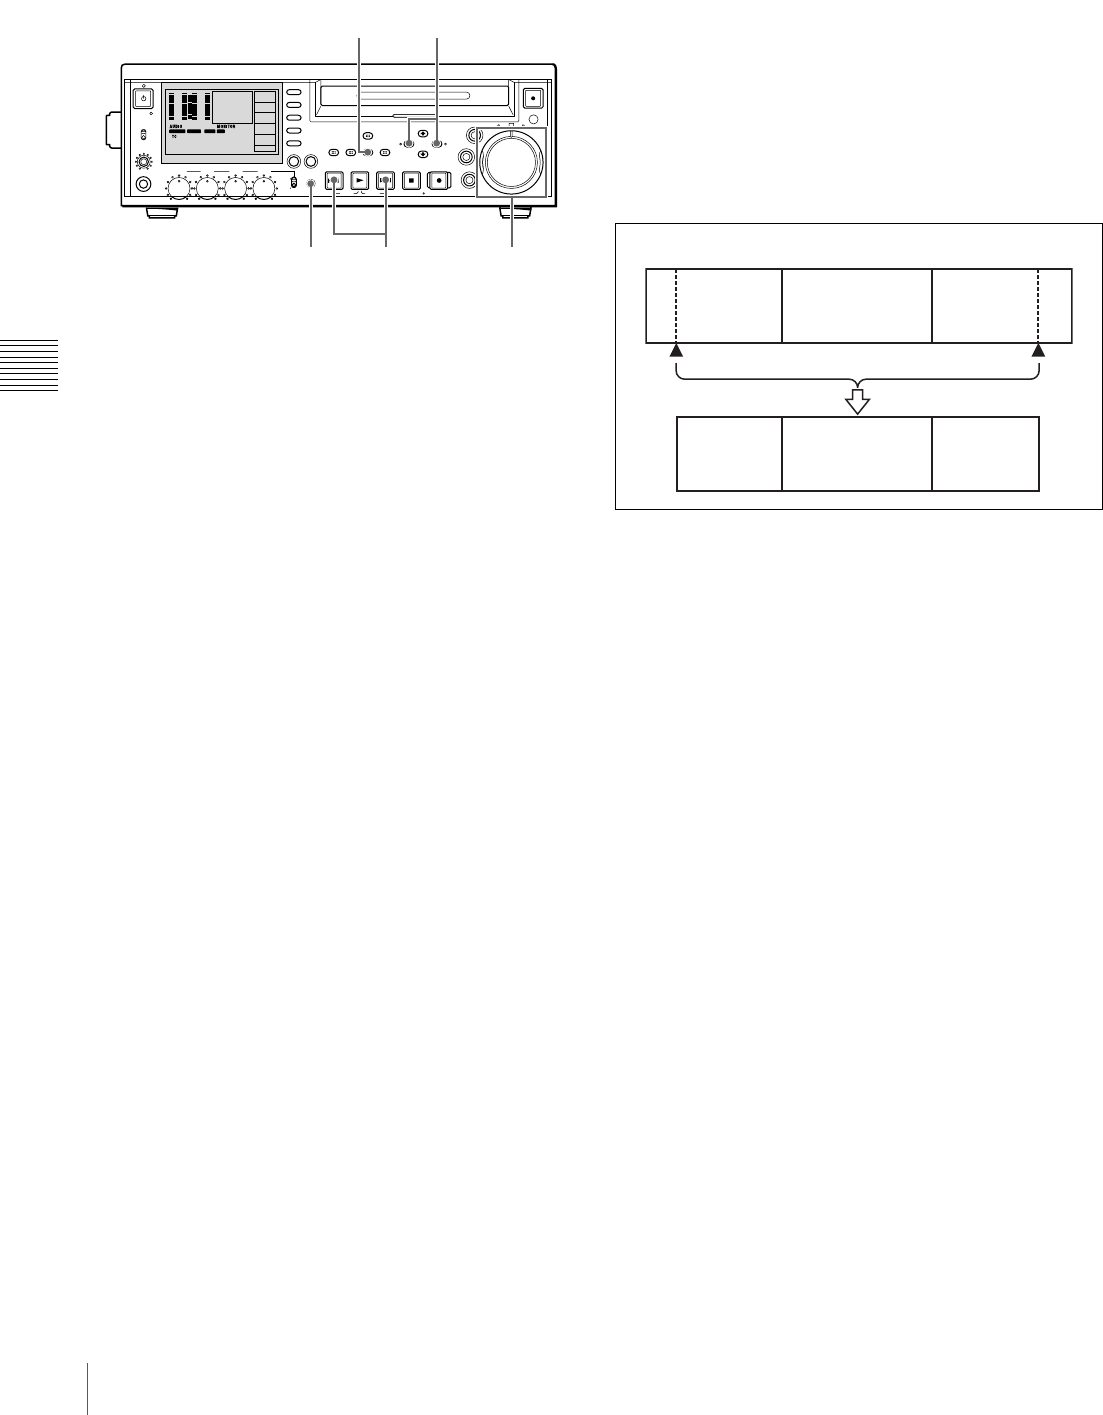
1
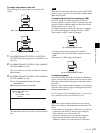
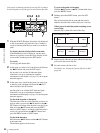
With the SUB CLIP button off, and the clip displayed
in full-screen mode, play back the clip or conduct a
search to find the point that you want to set as the In
point.
To display the desired clip in full-screen mode
If the thumbnail screen is displayed, use the arrow
buttons or jog dial to select the clip to display in full-
screen mode, and then press the SET button.
To search
Use the jog and shuttle dials.
2
At the point you want to set as the In point, hold down
the </IN button and press the SET button.
An In point is set, and the IN indicator lights.
If the unit is set up to superimpose character
information on the display (see page 32), the In point
timecode appears.
3
In the same way, search for the point you want to set
as the Out point, and then hold down the ,/OUT
button and press the SET button.
An Out point is set, and the OUT indicator lights.
If the unit is set up to superimpose character
information on the display (see page 32), the Out point
timecode appears.
To check the In point or Out point
The timecode of the In or Out point that you have set
appears when you press the </IN button or the ,/
OUT button. An image of the In point is cued up if you
hold down the </IN button and press the PREV
button or NEXT button. An image of the Out point is
cued up if you hold down the ,/OUT button and
press the PREV button or NEXT button.
To check the duration
Hold down the </IN button and the ,/OUT button
at the same time.
The duration appears on the screen.
To reset an In point or Out point
With the </IN button or ,/OUT button held down,
press the RESET button.
4
Holding down the SHIFT button, press the SET
button.
The section between the In point and Out point is
added to the end of the current clip list as a sub clip.
When you set In and Out points stretching across
several clips
One sub clip is created for each of the clips.
5
Repeat steps 1 to 4 until you have added all of the clips
you want to the current clip list.
6
Save the current clip list to disc.
For details, see “Saving the Current Clip List to Disc”
(page 64).
PHONES
VAR
JOG
MARK1
MENU
PAGEDISPLAY
SUB
CLIP
F1
F5
F4
F3
F2
SHIFT
CLIP
MENU
ESSENCE
MARK
SET
THUMB
NAIL
RESET
OUTIN
MARK2
SHUTTLE
TOP
KEY INHI
EXPAND
CHAPTER
F REV F FWD
END
PREV NEXTPLAY STOP
STANDBY
EJECT
CH 1 CH 2 CH 3 CH 4
NETWORK
LOCAL
REMOTE
ACCESS
LEVEL
-12
0
-30
-20
-60
1
-40
-12
0
-30
-20
-60
3
-40
42
4 CH
MPEG HD SP
VITC REM:077
M
COOO1
1080 60I
16 BIT 3
+
4
00:00.00:00
DF/NDF
NDF
P2
TC/VITC
VITC
TC MODE
PRESET
TCG
EXT
RUN MODE
RE C RUN
TS REC
PRESET
PB
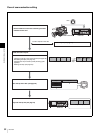
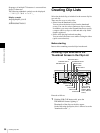
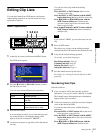
2,3
1
14
2,3,4
Clip 1
Sub clip 1
Clips recorded on the disc
Clip 2 Clip 3
Sub clip 2 Sub clip 3
In point Out point