


4 − Basic operations
TASCAM DV-RA1000HD 29
Naming files, projects, marks, etc.
Using a keyboard When recording on DVD, the
easiest way to name files (see “Renaming a file” on
page 47) and projects (see “Changing the name of a
project” on page 44), and create project notes (see
“Adding notes to a project” on page 43), etc. is using
a computer PS/2 keyboard (US standard layout) con-
nected to the front panel of the DV-RA1000HD.
WARNING
Do not connect or disconnect such a keyboard to
or from the DV-RA1000HD with the power turned on
as this may damage the DV-RA1000HD or the key-
board.
Basically, you can use this keyboard in the usual way.
Start editing titles with the keyboard by pressing the
keyboard’s left or right cursor key (or F3 or F4 on the
DV-RA1000HD).
Finish by pressing the keyboard’s [Enter] key.
NOTE
You may experience a few small incompatibili-
ties with punctuation symbols, etc. if you use a
keyboard that does not conform to the standard
101-key US layout (or the Japanese 106-key layout).
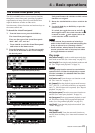
Working without a keyboard However, if such a
keyboard is not available, you can use the front panel to
name disc items.
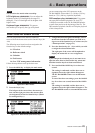
When a screen allowing you to name an item (project
or file) is shown on the display, highlight it so that it is
shown in inverse video.
Press the F4 (right) key to start the naming process.
Use the JOG/DATA dial to scroll through the set of cur-
rently available characters.
The available character sets are changed using the:
CAPS: all UPPERACASE letters from A
through Z, space and symbols
small: lowercase letters from a through z,
space and symbols
NUM: digits from 0 through 9, space and
symbols
Move backwards and forwards using the F3 and F4
keys. Press ENTER when done.
NOTE
The following symbols and punctuations are not
available for names:
* / : < > ? | .
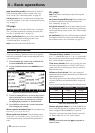
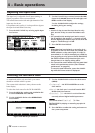
Adding project notes Notes are done in the same
way, except that here there are no character sets which
can be selected, and punctuation, etc. is available.
The arrow keys act as cursor keys to navigate around
the text block.
Use the ENTER key to add carriage returns and the
CANCEL key as a delete key.
Use the JOG/DATA dial to scroll through the numbers,
punctuation characters and uppercase and lowercase
letters available for the text.
Note that the text can contain more lines than the size
of the screen, and can be scrolled up or down.
When you’ve finished entering text, press and hold the
ENTER key for about a second to confirm the entry
before writing it to disc. (See “Writing the UDFMI” on
page 40.)
Alternatively, press and hold the CANCEL key for at
least one second to cancel the edits and return to the
previous screen.