


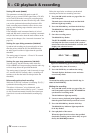

5 − CD playback & recording
34 TASCAM DV-RA1000HD
When recording, this allows the automatic division of
the recorded material into separate tracks when the fol-
lowing conditions occur:
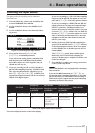
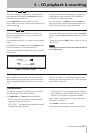
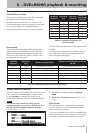
1
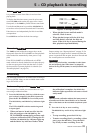
Press and hold the
ATRK
switch on the rec page of
the virtual front panel for at least one second.
The auto track screen appears.
Figure 5.4: AUTO TRACK screen
2
Move the cursor to highlight
MODE
.
3
Rotate the
JOG/DATA
dial to select
LEVEL
or
TIME
.
4
Press the
ENTER
key to conrm the setting.
Automatic track increment in level mode
Depending on the input source, tracks are added as fol-
lows:
Coaxial input
When you record S/PDIF signal from
a CD, MD, or DAT while DD mode is turned on, the
PQ code is used to determine the track divisions. If a
digital audio signal that does not contain the PQ code is
input via the coaxial input, a new track is started when
the signal level rises above the threshold after having
fallen below the threshold for the duration specified by
the
LEVEL INTERVAL
parameter on the auto track screen.
AES/EBU and analog inputs
The threshold level
(see “Setting the sound threshold level (
SOUND LEVEL
)” on
page 35) is used to divide tracks. A new track is started
when the signal level rises above the threshold after
having fallen below the threshold for the duration speci-
fied by the
LEVEL INTERVAL
parameter.
NOTE
You can also divide a recording into tracks manu-
ally by pressing the RECORD key during a record-
ing. Note that the DV-RA1000HD is unable to create
a track with a length of four seconds or less. Make
sure that you press the RECORD key at intervals of
four seconds or longer. However, recording may
sometimes stop if you press the RECORD key fre-
quently, even at an interval of five seconds. If you
plan to divide a recording into tracks repeatedly,
wait about 30 seconds until you press the
RECORD
key again.
CAUTION
On a CD, two seconds of silence automatically fol-
low such a track division (no audio data is lost—the
input signal is buffered before being written to the
disc).
TIP
Note that tracks produced in this way must con-
form to the Red Book standard (be more than four
seconds long) and there can be a maximum of 99
tracks on a disc.
Setting a level interval
You can specify the duration of silence to be detected in
level mode.
Move the cursor to the
LEVEL INTERVAL
parameter on the
auto track screen, then rotate the
JOG/DATA
dial to set
the duration in the range from one second through six
seconds (in one second steps).
Press the
ENTER
key to confirm the setting.
Setting a delay
You can offset the automatic track increment position in
level mode.
Move the cursor to highlight
DELAY
in the auto track
screen, rotate the
JOG/DATA
dial to set the delay time
in the range of –1.70 seconds through +1.70 seconds in
0.01 steps, then press the
ENTER
key to confirm the set-
ting.
TIP
The automatic track increment recording in level
mode starts when the audio signal rises above the
specified sound threshold. Therefore, the beginning
of the audio may not be recorded, or the beginning
of the subsequent track may be concatenated to
the end of the current track. To avoid these prob-
lems, set DELAY to a negative value, change the
recording start time and the start position of the
source audio signal. Alternatively, you can lower the
sound threshold.
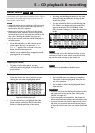
Auto track increment
DVD±RW
HD
MUTE key again to unmute recording. Press
and hold the MUTE key to mute the signal
until you release the key. Release the MUTE
key to unmute recording.
While recording is muted, the
MUTE key
indicator lights up.
Pressing RECORD key (or REC key) during
a recording divides a recording into tracks
(track increment).
•
•