


6 − DVD±RW/HD playback & recording
48 TASCAM DV-RA1000HD
You can split a file into two parts at the current play-
back position. This may be useful if you want to divide
a single long live recording into separate tracks, for
example.
NOTE
This operation is not possible with files recorded in
DSD mode.
You cannot divide a file that is transferred from a
CD if the CD has its copy ID set to “prohibit.”
TIP
You may want to set a mark at the split point so that
you can locate it easily.
File division always takes place on the current file.
Each resulting file must be at least 4 seconds in length
to be usable. If neither part resulting from the division
is greater than four seconds in length, the divide opera-
tion cannot be carried out. If one resulting file is under
4 seconds in length, a popup message warns you. If
you carry on with the divide operation, the short part is
deleted (of course, this might be a cough or fret noise
before a take which would be edited out in any case).
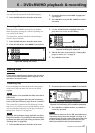
1
Select the
EDIT
sub-menu from the main menu.
2
From this sub-menu, select
DIVIDE
. Press
ENTER
.
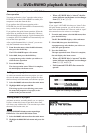
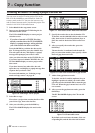
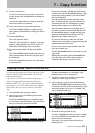
Figure 6.11: Confirming a file divide operation
The DV-RA1000HD enters pause mode, and the
rst three seconds of the le following the divi-
sion point are played back as a loop. Use the
JOG/DATA
dial to trim the division point so that
the new le starts at the point you want.
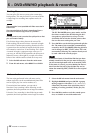
3
Press
ENTER
to set the division point and split the
le. The name of the second le is automatically
created by the DV-RA1000HD following division,
and is changed to BWF_FileXX where XX is the
next number following any number already used
by such a le in the current project.
TIP
If the second part of the divided file that you have
already renamed is the part you want to keep (e.g.
you are removing breath noise or drumstick clicks
at the start of a track), you must delete the file cre-
ated from the first part of the divided file, and re-
name the remaining BWF_FileXX file to the original
value.
Dividing files
The last action performed in the edit menu can be
undone (split files can be recombined and joined files
can be resplit, play lists can be undone, etc.).
If an action has been undone, you can redo it.
Note that if any recording is done following an edit
operation, that edit operation can no longer be undone.
Likewise, if any recording is done following an undo
operation, that undo operation can no longer be redone.
1
Select the
EDIT
sub-menu from the main menu.
2
Highlight
UNDO/REDO
and press
ENTER
. A popup
message appears with either
Undo
or
Redo
,
followed by the name of the operation you are
undoing or redoing (combine, divide, play list,
etc.).
3
Press
ENTER
to undo or redo the named opera-
tion, or
CANCEL
to cancel the undo/redo.
Undo and redo