


5 − CD playback & recording
36 TASCAM DV-RA1000HD
Setting DD mode (DD MODE)
This parameter switches DD mode on and off.
When you try to record S/PDIF signal from a CD, MD,
or DAT while DD mode is turned on, recording starts
when the unit detects the start ID in the PQ code. When
you use the synchronized recording function in DD
mode, recording starts when the source device starts
playing, and recording stops when the source device
stops playing.
If the automatic track increment function is in level
mode and DD mode is turned on, recording is automati-
cally divided into tracks when the track number on the
source device changes. (See “Auto track increment” on
page 34.)
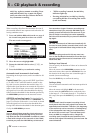
Setting the sync delay parameter (SYNC DELAY)
Synchronized recording can be started earlier or later
than the point at which the DV-RA1000HD detects
an audio signal level that is higher than the specified
threshold.
The setting range is between −1.70 and +1.70 seconds
(in steps of 0.01 second).
Setting the sync stop parameter (SYNC STOP)
You can specify the time duration after which the
DV-RA1000HD will stop recording when the audio sig-
nal level drops below the specified threshold.
The setting range is between 5 and 60 seconds (in steps
of 5 seconds) and INF (infinity, that is, recording will
continue even after the audio level drops below the
threshold).
Rehearsed synchronized recording
While the SYNC REC indicator is indicating “RHSL,”
synchronized recording can be rehearsed.
This allows “false starts” to be eliminated, as the
recording start time can be offset by up to 1.7 seconds
(in 0.01 second increments) from the time when input
signal level rises above the threshold (recording trig-
ger).
Follow the steps below to rehearse synchronized
recording and set the best recording start time:
1 Press the SYNC switch on the rec page of the vir-
tual front panel.
The unit enters rehearsal mode and the
RHSL
indicator lights up steadily.
2 Press the RECORD key, and then the PLAY key.
The
RECORD key indicator lights up and the
PLAY key ashes.
3 Start the recording source.
The
RECORD key ashes.
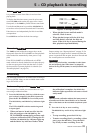
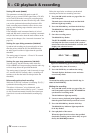
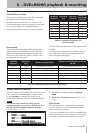
The DV-RA1000HD records to a buffer memory
and loops the rst four seconds of the synchro-
nized source after the threshold is exceeded, and
displays the rehearsal screen.
Figure 5.6: Rehearsing synchronized recording
4 Adjust the delay time, if necessary.
5 Press the ENTER key to conrm the setting.
The unit displays the home screen and enter
record ready mode.
NOTE
To cancel the setting, press the CANCEL key, in-
stead of the ENTER key.
Making the recording
1 Press the SYNC switch on the rec page of the vir-
tual front panel to place the DV-RA1000HD in
synchronized recording mode.
The
ON indicator lights up steadily.
2 Locate a source playback point slightly earlier
than the point from which you wish to record.
3 Press the RECORD key, then the PLAY key.
The
RECORD key indicator lights up and the
PLAY key ashes.
4 Start playback of the source.
When the signal level rises above the specied
threshold, recording starts with a delay as speci-
ed by the DELAY TIME parameter.