44
Programing a recording (REC MENU) (Continued)
Recording
Remaining volume
1) Press REC MENU.
The REC MENU appears.
2) Press QUICK MENU.
The Quick Menu appears.
3) Press
/ to select “Disc budget calculation”
then press ENTER.
The Disc budget calculation menu appears.
4) Press
/ to select a timer program, then
press ENTER or press ADJUST.
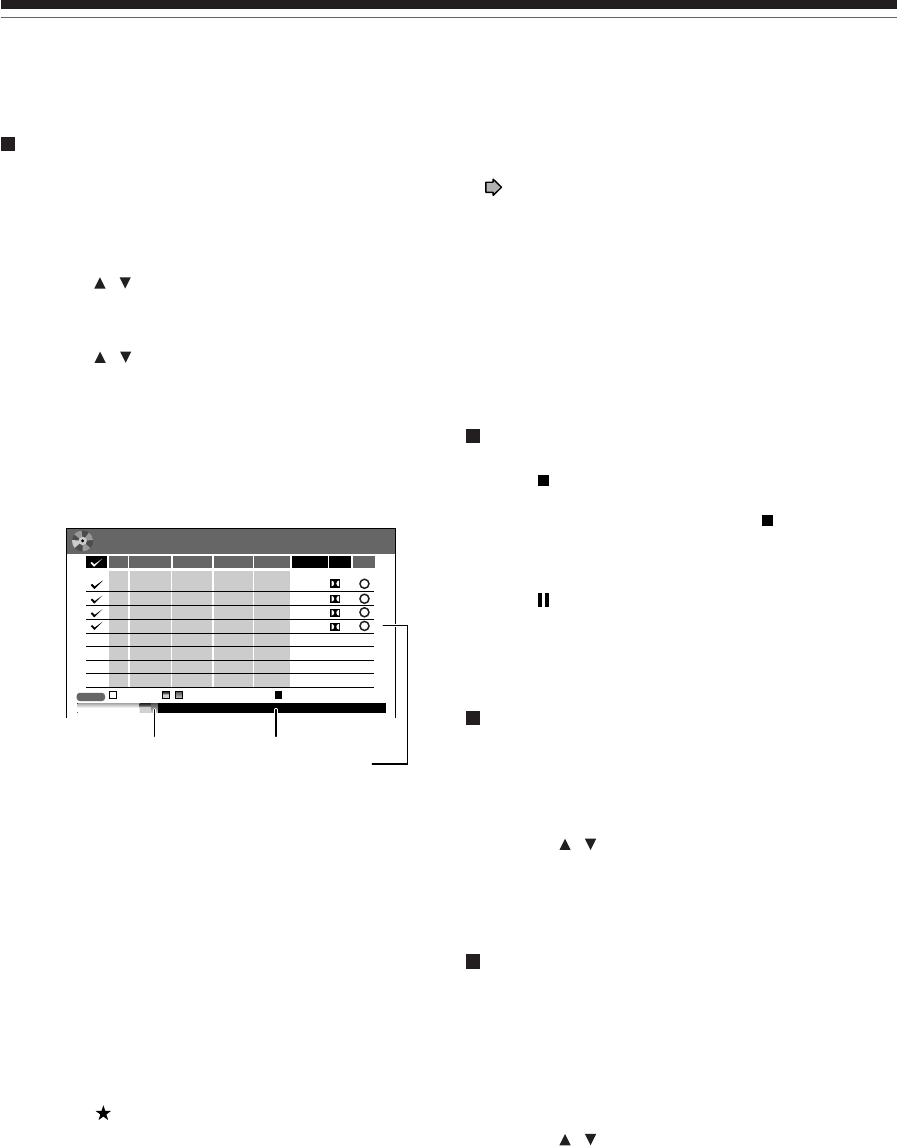
The recorder calculates on a bar graph how much
a specific program (identified by a check mark) will
occupy on the disc.
Pressing the ADJUST button can display or remove
the check mark.
e.g.
5) Correct the parameters of the timer program if
necessary.
(Skip to step 7 if you do not need this.)
You can change “Video” and “Audio”.
Select an item you want to modify and press the
ENTER button. The item will be ready to be altered.
Press the ADJUST button to modify. When
complete, press the ENTER button.
You can adjust to a lower mode (SP to LP) and/or
lower the rate to reduce the quality of the recording,
and thus provide more disc capacity (space).
6) Press
.
Program modification is registered.
7) Press REC MENU to exit the GUI.
REC
MENU
Disc budget calculation
9:00 pm
4/3 (Sa)
11
6.6
D/M2
DVD
CH
3
4/10
(
Sa
)
30
::–
–
–
–
:
:
:
:
:
:
pm
11 50
pm
MN
9
6.6
D/M2
DVD
10
4/13
(Tu)
30
pm
10 00
pm
MN
10
2.2
D/M1
DVD
42
4/16
(
Fr
)
30
pm
11
30
pm
LP
8
4.6
D/M2
DVD
4
4/16
(
Fr
)
30
pm
11
30
pm
SP
Audio
Video
MediaEnd
Result
Date Start
DVDHDD
Elapsed AvailableSelected(current)
()
DVD
Notes
• When a Reservation disc is inserted in the recorder
( page 48), you cannot check the remaining volume of
other discs.
• The nearest 8 programs are calculated at a time.
• While the recorder is preparing for or executing a
programmed recording, any program modification cannot
be registered. Only programs which will start after 5
minutes or later can be modified.
• Available disc volume is not displayed for a DVD-R/RW
disc on which DVD-Video finalize process was executed.
To stop a programmed recording
To finish,
Press
on the front panel twice.
When you press it once, a message appears. While
the message is displayed, press the
button once
again.
To pause recording,
Press
on the front panel.
To resume recording, press it again.
Turning the power off automatically after
completing a programmed recording
1) While executing a programmed recording,
press QUICK MENU.
The Quick Menu appears.
2) Press
/ to select “Auto power off” then
press ENTER.
Keeping the power on even after the
programmed recording finished
If the recorder turns itself on to execute a programmed
recording, it will turn itself off after finishing the
recording. You can restrict this and keep the recorder
powered on.
1) While executing a programmed recording,
press QUICK MENU.
2) Press
/ to select “Continuous power on”
then press ENTER.
Selected entry
Available disc volume
When the entry item is marked X, the
recording does not fit. Change the setting.


