


13
3.2 System Information
You can display system settings information as shown on Table 3.2 A below at any time by pressing the
DISPLAY button
. However, when the unit is displaying a decoded image from a multiplexer, you must
first switch the unit to encoded image displaying (The pictures is switching swiftly and the light
of
MUX/ DVR button is off) by pressing the MUX/ DVR button . Each sequential press of the
DISPLAY button displays a different message detailed in the following example. By default, the unit
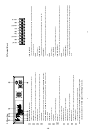
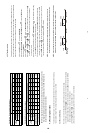
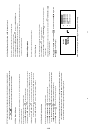
displays time, date, and an indicating bar of capacity status on a monitor as shown next.
Default display
(Capacity Used) (Capacity Remaining)
09- 05-2001
16:13:02
(Date) (System Time)
Press the
DISPLAY
button once; the unit will display the following sample message plus the default
display. Press the
DISPLAY
button again; the unit will not display any OSD message. Press the button
one more time to back to the default display.
Table 3.2 A. Description of Table 3.2 A
(HD1+HD2: 76GB): Total capacity of installed hard disk, 76 GB
(11.2 HR):
Total 11.2 hour minimum guaranteed recording
time available. Actual recording time may be
longer in everyday use.
( ): Timer record activated
(
):
Alarm record activated
(QUALITY: HIGH): Record quality setting, HIGH
(NTSC): NTSC system
(RATE: 6 HR): Setting of Record time mode, 6 hours
(20 F/S): Record speed setting, 20 fields/sec
(HD): Hard disk Compartment
(P): Y Hard disk installed; . No hard disk installed
(SIZE 38GB): The capacity of the installed hard disk
POS: Percentage of system; R: Recording; P: Playback
HD 1+HD 2: 76G 11.2 HR
QUALITY: HIGH NTSC
RATE: 6 HR 20 F/S
HD P SIZE POS
1 Y 38 G 2.5%R (P)
2 Y 38 G 0%R (P)
3 . .
14
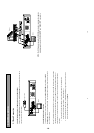
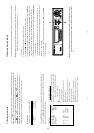
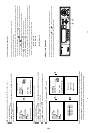
3.3 Updating System Software
If the system software of the unit needs to be upgraded, please take the following steps to safely update it.
Important: Before carrying out the following procedures, please ensure the floppy disk is working and the
file of system software is intact (The size of the file should be up to 170 K.)
1. Turn off the unit.
2. Insert the floppy disk into the built-in floppy drive of the unit.
3. Hold down the
and
buttons simultaneously, and then turn on the unit.
4. Keep holding down the buttons until the unit sounds a tone and display the message “ SOFTWARE
UPDATE” and an indicating percentage of proceeding against a blue background on the screen. Now
the unit is updating the system software, which will take approximately 90 seconds to process.
5. Restart the unit when the device sounds a tone twice and displays the message “ PLEASE RESTART”.
The process is complete.
(If you have already followed the procedure 1~5, the unit, however, is not being able to power on.
Please first check if the floppy disk you are using is functioning and the file is intact. And then start the
procedure 1 ~ 5 all over again.)
6. Verify the version of system software by entering main menu and then press
and pause
buttons at the same time.
Warning: Don’t Interrupt the process while the unit is updating itself and proceed with a floppy
disk containing with no system software of the unit, which would cause the unit hang
on.
1-7