


23
NOTE: The playback speed will be displayed on the screen. However, when playing a recorded
video from a multiplexer, the playback speed only display on encoding (multiplexing) mode.
Press the
MUX / DVR button to switch between decoding and encoding mode.
4.3.2 Slow Forward/Reverse
There are 4 speeds available for a slow playback: 1/2, 1/4, 1/8, 1/16. Follow the instructions below to
proceed with a slow playback.
While playing back recorded video at the recorded speed:
(1) Press the
PAUSE/STEP button for the slow playback mode.
(2) Forward: Press the
FWD button to view the recorded video in the forward direction at a speed
faster than the recorded speed. Each subsequent press of the FWD button slows the rate.
(3)
Reverse:
Press the
REV
button
to view the recorded video in the reverse direction at a speed
faster than the recorded speed. Each subsequent press of the REV button slows the rate.
(4) Normal: Press the
PLAY button to return to the normal speed of playback.
4.3.3 Play Back Picture-by-picture
While playing back recorded video at the recorded speed:
(1) Press the
PAUSE/STEP button for the picture-by-picture mode.
(2) Press the
PAUSE/STEP button to display one frame/field of a picture at a time in the forward
direction. (When playing back recorded video recorded by a multiplexer, each sequential press
of the
PAUSE/STEP button will display each camera in sequence.)
(3) Press the
PLAY button to return to the normal speed of playback.
NOTE: A flickering condition of an image occurs while playing back picture-by-picture, please set
the FLICKER REDUCTION option to ON in the SYSTEM page of the main menu. However,
when this function is activated, a slight loss of picture quality may occur.
24
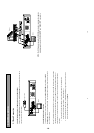
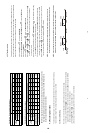
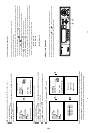
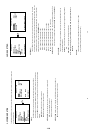
SEARECH
FULL LIST
ALARM LIST
TIME SEARCH
HD 1
2001-02-01 12: 20
A 2001-02-01 13:30
2001-03-02 14:20
2001-03-02 14:20
R 2001-03-02 14:20
HD 2
T 2001-02-01 13:30
4.3.4 Play Back Recorded Video from a HDD of the mobile rack
To play back a recorded video from a HD3, take the following steps:
(1) Press setup button to enter the main menu.
(2) Select DISK and press the
ENTER
/
SAVE
ENTER/SAVE button to enter DISK SETTING page.
(3) Set the HD3 USAGE to REC/PLAY and then exit the main menu.
(4) Use the Search function to access desired recorded video. Specific operation details please refer to the
next section 4.4 Search Operations.
4.4 Search Operations
This section shows you how to access recorded video.
4.4.1 Full List Search
Take the following steps to proceed with the full list search function.
(1) Press the SEARCH button
to enter the search mode.
(2) Select the FULL LIST and press the
ENTER
/
SAVE
ENTER/SAVE button to access the complete list of
recorded video.
(3) Highlight the specific recorded video of your requirement and press the
ENTER
/
SAVE
ENTER/SAVE button
to display the selected video.
(Key Operation: Press
Up/Down buttons to select a video; Press Right / Left
buttons
to flip over a page.)
NOTE: T: Timer recording; R: External trigger recording; A: Alarm recording.
1-12