


17
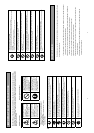
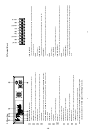
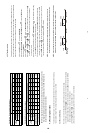
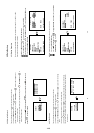
PAL System (For using with single camera)
Possible Recording Time HDD=80 Gigabytes
Refresh Rate (Field/Sec)
50 25 12.5 6.25 3.13 1.56 0.89 0.31 0.21 0.16
HIGH
14 hr 28 hr 54 hr 112 hr 224 hr 448 hr 784 hr 2240 hr 3360 hr 4480 hr
STANDARD
22 hr 44 hr 88 hr 176 hr 352 hr 704 hr 1232 hr 3520 hr 5280 hr 7040 hr
Image
Quality
BASIC
28 hr 56 hr 112 hr 224 hr 448 hr 896 hr 1568 hr 4480 hr 6720 hr 8960 hr
REC Time Mode
3 hr 6 hr 12 hr 24 hr 48 hr 96 hr 168 hr 480 hr 720 hr 960 hr
REC interval (1/50 sec)
1 2 4 8 17 32 57 161 241 321
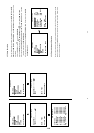
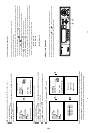
PAL System (For using with a multiplexer)
Possible Recording Time HDD=20 Gigabytes
High
3.5 hr 10.5hr 24.5hr 38.5hr 73.5hr 143.5hr 248.5hr 703.5hr 1053.5hr 1403.5hr
Standard
5.5 hr 15.8hr 36.8hr 57.8hr 110.3hr 215.3hr 372.8hr 1055.3hr 1580.3hr 2105.3hr
Image
Quality
Basic
7 hr 21.0hr 49.0hr 77.0hr 147.0hr 287.0hr 497.0hr 1407.0hr 2107.0hr 2807.0hr
Refresh Rate (Field/Sec)
(Figures on the setup menu)
50
(50)
16.7
(25)
7.14
(12.5)
4.55
(6.25)
2.38
(3.13)
1.22
(1.56)
0.70
(0.89)
0.25
(0.31)
0.17
(0.21)
0.12
(0.16)
REC Time Mode
3 hr 6 hr 12 hr 24 hr 48 hr 96 hr 168 hr 480 hr 720 hr 960 hr
NOTE: Recording times on the tables above are estimated. For actual available recording time of a
recording configuration, please refer to the system information of the DVR. (Please refer to
section 3.3 system information for more details.)
4.2 Recording Operations
This section details the way to record video into hard-disk drives. Before commencing with the recording
function, please configure the recording setting properly according to your needs.
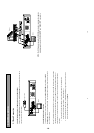
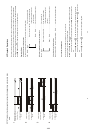
4.2.1 Manual Recording
When the unit is in the live display mode, take the following steps to start recording:
(1) In live display, press the
REC
button
to record video onto a hard disk drive with the corresponding
programmed recording settings. The monitor should display a flashing REC message and the REC
button will light up indicating the unit is in the recording status.
(2) Press the
STOP button to stop recording any time.
(3) To access just recorded video, please refer to section 4.4 for more details.
18
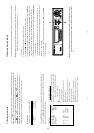
4.2.2 Timer Recording
Timer recording provides two periods of time each day in a weekly table which programs the DVR to turn
on and off at specified times. This way the DVR will start and stop recording according to the programmed
schedule. Please take the following steps to program the scheduled recording.
(1) Press the SETUP button
to enter the MAIN MENU.
(2) Select the RECORD TIMER and press the ENTER/SAVE button
to enter the TIMER page.
(3) Select the TIMER-SET.
(4) Press the
ENTER
/
SAVE
ENTER/SAVE button to enter the REC SCHEDULE table.
(5) Use the
button and the
button to locate the specific day/hour/minute and use the
button
and the button to set the day/hour/minute you wish. The time is displayed in a
24-hour clock format.
(6) After scheduling is completed, press the
ENTER
/
SAVE
ENTER/SAVE button and set OK to save the setting
or select CANCEL to leave the page without saving the settings.
(7) To activate the programmed recording schedule, set the REC ENABLE to ON. As the scheduled
recording is on, the red indicator of the Timer Record will be on as well. To deactivate it, set to OFF.
(8) Press the
STOP button during the scheduled recording to stop it at any time. If you wish to
continue the scheduled recording, press the REC button
to proceed.
NOTE: You can proceed to start the scheduled recording from the current time if it is in the
scheduled interlude as soon as setting is completed. Press the REC button to proceed.
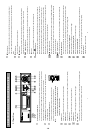
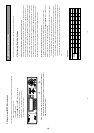
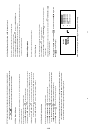
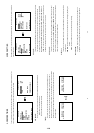
NOTE: If you activate the recording function before the scheduled recording, the unit will operate
recording as showed the diagram below and keep those Image in different files.
03:00 06:00 08:00 12:00 14:00
START END START END
Start Manual
Recording
Timer Manual Timer Manual
1-9