• To prevent fire or shock hazard, do not expose the product to rain or moisture.
• To avoid electrical shock, do not open the case of this product.
• Operate this product using only the recommended AC Power supply.
• Do not overload electrical outlets or extension cords; this can result in fire or electric
shock.
• Keep this product away from strong magnetic fields.
• Do not expose this product in direct sunlight or strong reflected rays.
• Refer servicing to qualified personnel only.
• Do not change or modify this product, the warranty will be voided.
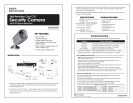
• 1/3” Sony Super HAD CCD
• High Resolution 550 TV Lines (Color), 600 TV Lines (B/W)
• Day/Night Camera
• On Screen Display (OSD)
• 3D DNR (Digital Noise Reduction) with 3D filter
• D-WDR (Digital Wide Dynamic Range)
• 3-Axis Gimbals Bracket
• DC 12V Power Source
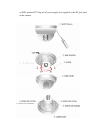
1. In order to open the dome camera, insert a suitable “-“ driver into the slot① and
twist the driver.
2. Attach the base housing② to the wall or ceiling, wherever you want to install the
camera. Locate a wall stud or ceiling joist and secure the base housing② using the
supplied screws③.
3. How to set angle of view:
- Loosen the locking screws④⑤ and adjust the camera direction by turning the pan
bracket⑤ left or right, the tilt bracket④ up or down, then fix the screws firmly.
- Turn the camera body⑥ clockwise or counter-clockwise to upright images on the
screen.
4. If necessary, change the settings to get the best images depending on your
application by using the buttons on the rear of the camera (refer to the instruction
manual for OSD control).
5. Assemble the dome cover⑦ by pushing back to the base housing②.
6. Connect the one end of BNC cable (not supplied) to the BNC (F) of 5’ cable
attached to the camera and the other end (BNC) of cable to the video devices such
PRECAUTIONS
FEATURES
INSTALLATION


