


69
MULTI
0
123456789
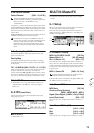
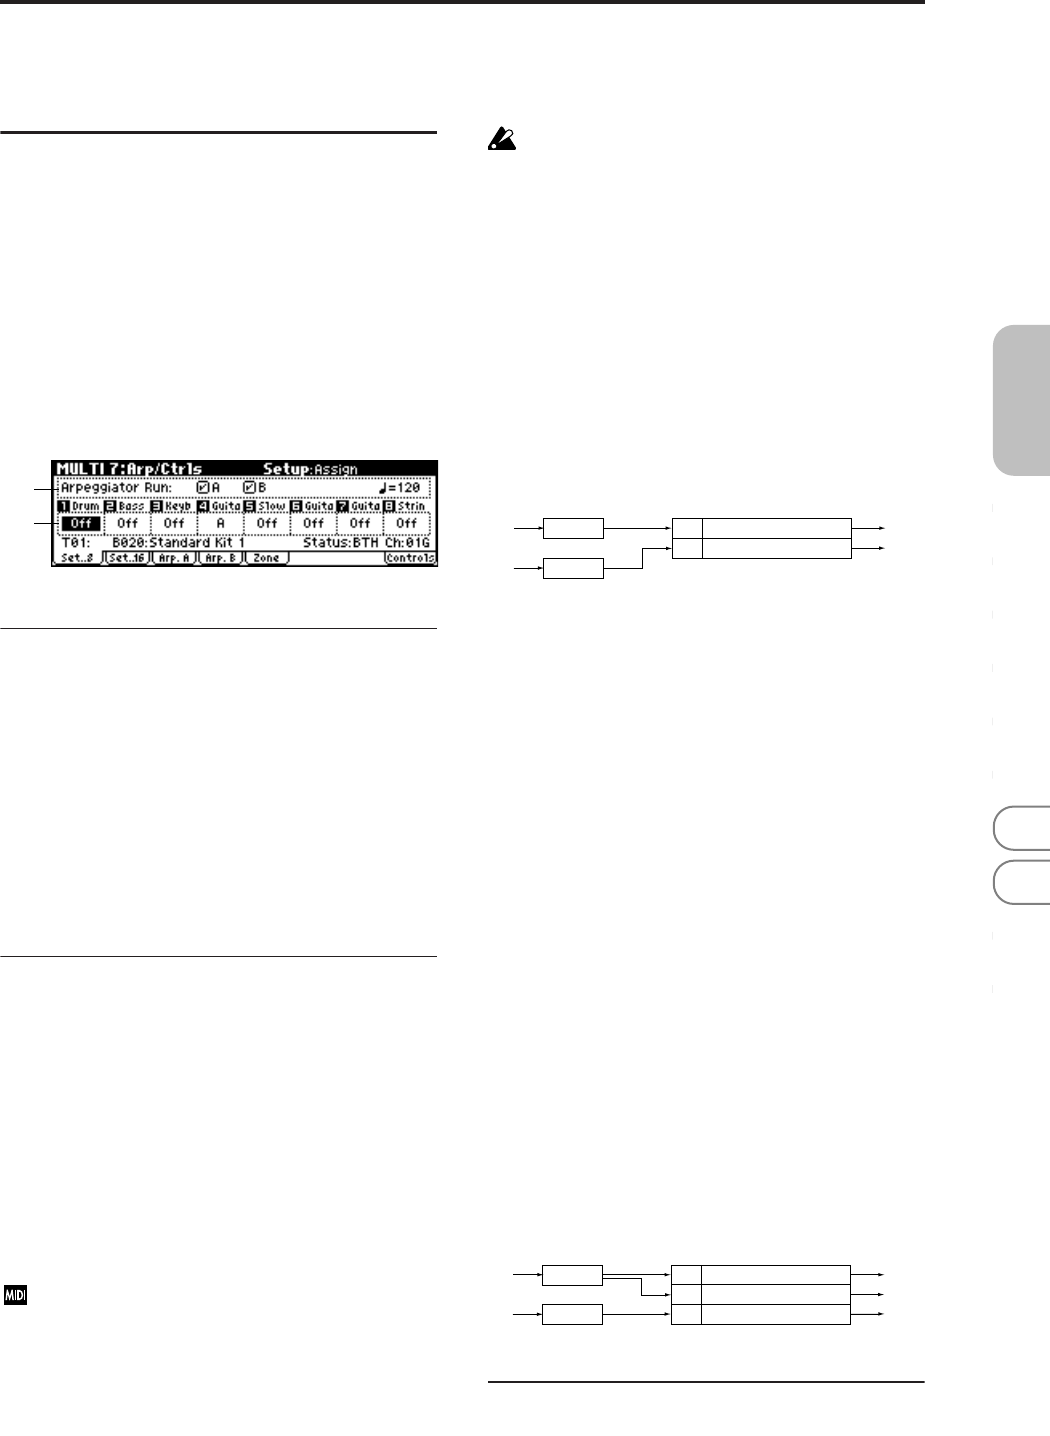
MULTI 7: Arp/Ctrls
(Arpeggiator/Controls)
Here you can specify how the arpeggiator will operate in
Multi mode. These settings can be made for each multi set.
In Multi mode (as in Combination mode), you can run the
two arpeggiators simultaneously.
This allows you to apply different arpeggio patterns to two
tracks, or use velocity to switch between two different
arpeggio patterns, etc.
7–1: Set..8 (Setup T01–08)
7–2: Set..16 (Setup T09–16)
7–1(2)a: Arpeggiator Run,
(Tempo)
Arpeggiator Run A, B (Run A, B)
When the [ARP ON/OFF] button is on, the arpeggiator(s)
that are checked here will function for the track(s) to which
they are assigned by “Assign.” When the arpeggiator is on,
A and B can be turned on/off independently.
(Tempo) [040...240, (EXT)]
Specify the tempo of the arpeggiator. This can also be
adjusted by the REALTIME CONTROLS C-mode [TEMPO]
knob.
☞p.56 “ (Tempo)” (0–1a)
7–1(2)b: Assign
Assign [Off, A, B]
This assigns arpeggiator A or arpeggiator B to each track 1–
8, 9–16. When the [ARP ON/OFF] button is turned on, the
arpeggiator specified for each track will run, subject to the
“Arpeggiator Run” settings and setting here.
Off: The arpeggiator will not operate.
A: Arpeggiator A will operate. Use the Arp. A page to select
the arpeggio pattern and set the parameters.
B: Arpeggiator B will operate. Use the Arp. B page to select
the arpeggio pattern and set the parameters.
If you wish to realtime-record the arpeggio pattern into a
pattern, assign either arpeggiator A or B to the track.
If a track 1–16 to which arpeggiator A or B has been
assigned is set to a track “Status” (2–1a/2a) of INT or
BTH, the note data generated by the arpeggiator will
sound the X50/microX without regard to the “MIDI
Channel” (2–1a/2a) setting of each track. If the “Status”
is BTH, EXT, or EX2, MIDI note data will be transmit-
ted on the “MIDI Channel” of each track.
At this time, the arpeggiator can be triggered by the
“MIDI Channel” of any track 1–16 assigned to
arpeggiator A or B respectively.
The X50/microX’s arpeggiator can be controlled from
an external sequencer, and the note data generated by
the arpeggiator can be recorded on an external
sequencer. (☞p.179)
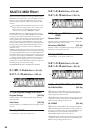
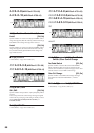
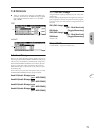
Example 1)
On tracks 1 and 2, set “MIDI Channel” (2–1(2)a) to 01 and
“Status” (2–1(2)a) to INT. Assign arpeggiator A to track 1
and arpeggiator B to track 2, and check “Arpeggiator
Run A, B” (7–1a). In “Control Track” (0–1a) choose
Track01.
With the front panel [ARP ON/OFF] button is off, play
the keyboard and tracks 1 and 2 will sound simulta-
neously.
When you turn on the front panel [ARP ON/OFF] button
and play the keyboard, arpeggiator A will operate for
track 1 and arpeggiator B will operate for track 2.
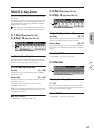
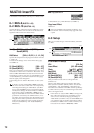
Example 2)
For tracks 1, 2 and 3, set the “MIDI Channel” (2–1(2)a) to
01, 02, and 03 respectively, and set “Status” (2–1(2)a) to
INT. Assign arpeggiator A to tracks 1 and 2, and
arpeggiator B to track 3. Check the “Arpeggiator Run A,
B” (7–1a) setting.
• In “Control Track” (0–1a), choose Track01.
Playing the keyboard when the front panel [ARP ON/
OFF] button is off will play the sound assigned to track 1.
Playing the keyboard when the front panel [ARP ON/
OFF] button is on will cause arpeggiator A to operate for
tracks 1 and 2, and produce sound for both tracks.
• In “Control Track” (0–1a), choose Track02.
Playing the keyboard when the front panel [ARP ON/
OFF] button is off will play the sound assigned to track 2.
Playing the keyboard when the front panel [ARP ON/
OFF] button is on will cause arpeggiator A to operate for
tracks 1 and 2, and produce sound for both tracks.
• In “Control Track” (0–1a), choose Track03.
Playing the keyboard when the front panel [ARP ON/
OFF] button is off will play the sound assigned to track 3.
Playing the keyboard when the front panel [ARP ON/
OFF] button is on will cause arpeggiator B to operate for
track 3, and play the sound assigned to track 3.
• Alternatively, you could choose Track01 in “Control
Track” (0–1a) to run arpeggiator A for tracks 1 and 2,
and use an external MIDI device connected to the X50/
microX’s MIDI IN to send note data to MIDI channel 3 to
play arpeggiator B.
■ 7–1(2): UTILITY
☞“Write Multi,” “Copy From Combi” (0–1), “Copy Arpeg-
giator” (COMBI 7–1)
7–1a
7–1b
Track2 MIDI Ch=1ch Status=INT
Arpeggiator
A
Arpeggiator
B
Arpeggiator
Assign
A
B
Pattern - A
Pattern - B
Pattern - A
Pattern - B
Trigger
= Ch1
Trigger
= Ch1
Track1 MIDI Ch=1ch Status=INT
Pattern - B
Pattern - A
Pattern - A
Track2 MIDI Ch=2ch Status=INT
Arpeggiator
A
Arpeggiator
B
Arpeggiator
Assign
A
A
Pattern - A
Pattern - B
Trigger
= Ch1, Ch2
Trigger
= Ch3
Track3 MIDI Ch=3ch Status=INTB
Track1 MIDI Ch=1ch Status=INT