


28
English
3139 246 XXXXX
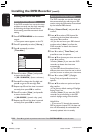
Automatic time/date settings
The DVD recorder can set the time and
date automatically by referring to a PBS
station, using the information transmitted
by the selected PBS channel.
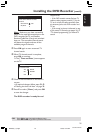
1 Select { Smart Clock } and press 2 to
confirm.
2 Press 3 4 to select a PBS channel for
transferring the time/date information,
then press 1 to confirm.
➜ If you do not know your PBS channel
number, select { Auto } to allow the
DVD recorder to detect the channel
automatically.
3 Press 4 to select { Time Zone } and
press 2 to enter its options.
4 Press 3 4 to choose your time zone and
press 1 to confirm.
➜ Select { Auto } if you want the DVD
recorder to detect the time zone
automatically.
➜ If the PBS channel broadcasts from a
different time zone than the one in which
you live, be sure to select your time zone.
5 Press 4 to select { DST } (Daylight
Saving Time) and press 2 to enter its
options.
6 Press 3 4 to select an option and press
1 to confirm.
➜ The factory default setting of Daylight
Saving Time is on.
➜ Select { Auto } if you want the DVD
recorder to set according to the PBS
station’s daylight saving time schedule.
Helpful Hint:
– If you store a TV channel that transmits
PBS on program channel ‘P01,’ the date and
time will automatically be transmitted and
constantly updated when in standby.
Installing the DVD Recorder (cont’d)
TIPS: Press 1 to go back to previous menu item. Press SYSTEM-MENU to exit the menu.
Setting the time and date
Manual time/date settings
If the DVD recorder has not set the time
and date correctly, set the clock manually
by following the steps below. Manual
clock setting overrides automatic clock
setting.
1 Press SYSTEM-MENU on the remote
control.
➜ The system menu appears on the TV.
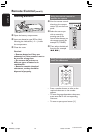
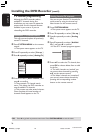
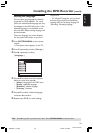
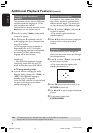
2 Press 4 repeatedly to select { Set-up .}
3 Press 2 repeatedly to select
{ Time-date .}
DVD-VIDEO-TITLE 04|CO1
Time-date Analog Ch
.
Video output Audio output
STOP
Set-up
Smart Clock
Time
Date
Time Zone
DST
4 Press 4 to select { Time } and press 2
to enter the time field.
➜ { 00 : 00 AM/PM } (hours : minutes.)
5 Press 3 4 to change the first digit and
press 2 to go to the next digit field.
6 Repeat step 5 until the time is entered
correctly, then press OK to confirm.
7 Press 4 to select { Date } and press 2
to enter the date field.
➜ { 00-00-0000 } (month : day : year.)
8 Repeat step 5 until the date is entered
correctly, then press OK to confirm.
MRV660_17_Eng40 9/3/05, 10:25 AM28