


72
••••••••••••••••••••••••••••••••••••••••••••••••••••••••••••••••••••••••••••••••••••••••••••••••••••••••••••••••••••••••••••••••••••••••••••
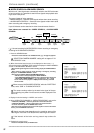
Making Copy/Restore
■ Making Copy/Restore
Data in MAIN HDD or SUB HDD can be copied to Compact
Flash Card. Data in Compact Flash Cards can be restored
to MAIN HDD.
Setting
“MAIN HDD } CFC” : The data recorded on MAIN
HDD is copied to Compact Flash Card.
“SUB HDD } CFC” : The data recorded on SUB
HDD is copied to Compact Flash Card.
“CFC } MAIN HDD” : The data recorded on Com-
pact Flash Card is restored to MAIN HDD.
“SUB HDD } CFC” is appeared when “PARTI-
TION” is selected on “HDD SETTING” of the <INI-
TIALIZATION> screen.
Before use, read the cautionary notes described
in the manual included with Compact Flash Card.
1-1. (To copy to a Compact Flash Card • • • )
Insert the Compact Flash Card into the COMPACT FLASH
slot of this unit.
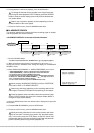
1-2. Press the COPY button.
• The <COPY> screen appears.
1-3. Display “MAIN HDD
}
CFC” (“SUB HDD
}
CFC”
)
on
“DIRECTION” and confirm.
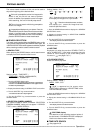
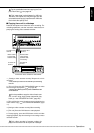
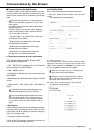
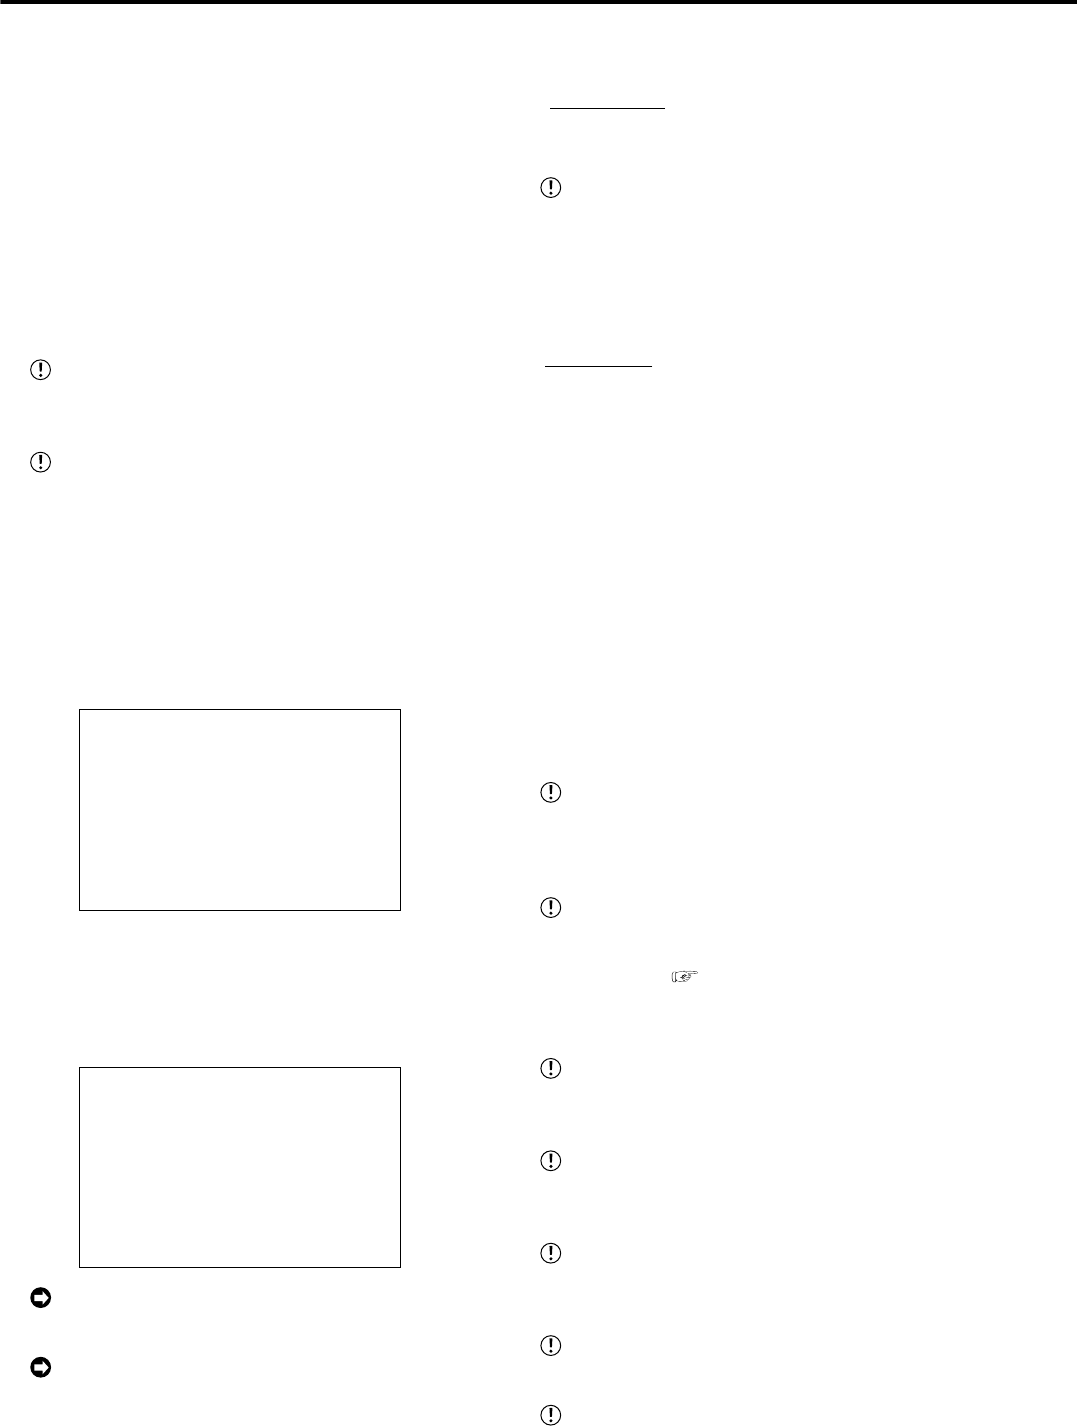
<COPY>
>>
DIRECTION MAIN HDD}CFC
MODE OVERWRITE
TRANSFER PERIOD START•END
START 01-01-2004 00:00:00
END 01-01-2004 00:00:10
EXECUTE
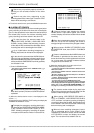
2-1. (To restore data from or Compact Flash Card • • • )
Press the COPY button.
• The COPY screen is displayed.
2-2. Display the desired setting “CFC
}
MAIN HDD” on
“DIRECTION” and confirm.
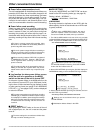
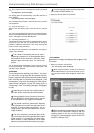
<RESTORE>
>>
DIRECTION CFC}MAIN HDD
MODE OVERWRITE
TRANSFER PERIOD START•END
START 01-01-2004 00:00:00
END 01-01-2004 00:00:10
EXECUTE
The menu changes to <RESTORE> when “CFC
} MAIN HDD” is selected.
The warning display at the time of RESTORE
execution displays “RESTORE/XXX” when the <RE-
STORE> screen is displayed and “REST/XXX” when
the normal screen is displayed.
3. Display the desired setting in “MODE” and confirm.
Setting ( default : “OVERWRITE” )
“OVERWRITE” : Overwrites current data.
“NO OVERWRITE” : Writes following last entry.
When “DIRECTION”, and “OVERWRITE” on
“MODE”, all data on the Compact Flash Card re-
gardless of menu division is overwritten.
4. Display the desired setting in “TRANSFER PERIOD” and
confirm.
Setting ( default : “START•END” )
“START•END” : Sets the recording start/end date/
time.
“START” : Sets the recording start date/time.
“LATEST DATA” : Starts copying from the end point
according to the available memory in the COPY de-
vice.
5. Set the desired copy (restore) start date and time to “START”
and confirm.
6. (When setting “START•END” in step 4 • • • )
Set the desired copy (restore) end date and time to “END”
and confirm.
7. Select “EXECUTE” and turn the SHUTTLE ring clockwise.
• The copy (restore) operation is executed.
• If the copy (restore) operation does not start, turn the
SHUTTLE ring counterclockwise or press the COPY button.
The “COPY/NO MEDIA” or “REST/NO MEDIA”
warning is displayed when executing COPY or
RESTORE without a Compact Flash Card inserted
in the slot.
If the copy range exceeds the available ca-
pacity of the Compact Flash Card, “COPY/SIZE/
DATA ERROR” warning will appear on the screen
when copying (
see pages 87,88). In this case,
set again using narrower copy range or insert a
Card larger capacity.
If a data with no date is included in the copy
range, “COPY/SIZE/DATA ERROR” warning will ap-
pear on the screen.
When there is no data to restore in the Compact
Flash Card “REST/SIZE/DATA ERROR” warning will
appear on the screen when restoring.
A “REST/MEDIA ERROR” error is displayed
when executing RESTORE from a non-FSM2 Com-
pact Flash Card.
For usable Compact Flash Card, check with your
dealer of purchase.
When copy is performed during record, an im-
age may not be recorded at the time of a copy start
and an end. Be careful.