


75
ENGLISH
••••••••••••••••••••••••••••••••••••••••••••••••••••••••••••••••••••••••••••••••••••••••••••••••••••••••••••••••••••••••••••
Operations
Points to be aware of regarding MIRROR mode
• Performing RESTORE restores identical data to
both HDD master and HDD slave.
• Performing “MAIN HDD DATA CLEAR” in “MIR-
RORING” mode deletes all data in both HDD.
• In the event of a HDD master/HDD slave malfunc-
tion, HDD master/HDD slave items are registered
separately on the <WARNING LOG LIST>.
• In the event that either HDD maste or HDD slave
malfunction, the “MIRROR” warning is displayed,
and the operable HDD continues the recording.
Press the WARNING RESET button on the front
of the unit to reset the “MIRROR” warning.
• The “MIRROR” warning is displayed every time
the unit is started-up until the faulty HDD is re-
placed.
• Automatic data archive commences at start-up
after replacement with an operational HDD.
• If any HDD of each HDD master and HDD slave
malfunction simultaneously, the data can not be
repaired.
• Ask at place of purchase about data restoration
when repairing/replacing a faulty HDD.
Points to be aware of regarding PARTITION
mode
• Either “MAIN” or “SUB” can be selected for copy.
• Playback, search, information display, REMAIN
HDD, CALL OUT, and data delete functions are
performed independently for “MAIN” and “SUB”.
• When “HDD REPEAT REC SUB” is set to “OFF”,
and all memory in SUB HDD is used, the record-
ing stops. Afterwards, the indicator will blink when
an alarm enters, but no recording will be
performed.
• When at the time of “ALARM CH” use an alarm
signal enters to a camera number not set for nor-
mal recording, pre-alarm recording may not be
performed in some cases.
♦ PARTITION/PARTITION SIZE
PARTITION mode only uses the internal HDD.
PARTITION mode designates the area inside the HDD
that is specified as each HDD’s sub-device capacity for
Alarm recording. This independent partition inside the
HDD allows to keep the data of alarm recording.
The normal recording area is referred to as “MAIN”,
and the alarm recording area (PARTITION area) is re-
ferred to as “SUB”.
1. Turn ON the MAIN switch on the rear of the unit, and wait
until the ACCESS indicator goes off. Hold down the REC/STOP
button, and press the POWER button on the front of the unit.
• The <INITIALIZATION> screen is displayed.
POWER button operation will not be accepted while
the ACCESS indicator is flashing. Press the POWER
button after the indicator turns off.
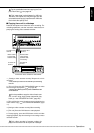
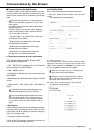
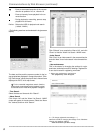
2. Select “HDD SETTING” by turning the JOG dial, display
“PARTITION”, and turn the SHUTTLE ring clockwise.
• The “PARTITION SIZE” setting appears on the
<INITIALIZATION> screen.
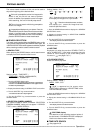
<INITIALIZATION>
>>
HDD SETTING PARTITION
PARTITION SIZE 10
%
POWER OFF
INITIALIZATION
ALL DATA WILL BE ERASED
WHEN PROCEED INITIALIZATION
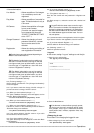
3. Display the desired device capacity, and turn the SHUTTLE
ring clockwise.
• The setting is made.
• Setting of “PARTITION SIZE” ( default : 10% )
10%, 20%, 30%, 40%, 50%, 60%, 70%, 80%, 90%
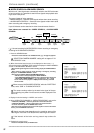
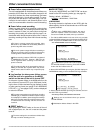
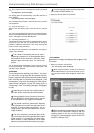
The storage area in MAIN HDD set in “PARTITION”
is displayed with the percentage(%) and the record-
able time of that storage area is displayed in “<ESTD
REC>”.
2
.
5P
STD
2
.
5P
STD
2.5P STD 2.5P STD
2.5P STD 2.5P STD
<ESTD REC> D H M %
9
7
8
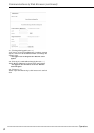
4. Select “INITIALIZATION” by turning the JOG dial, and turn
the SHUTTLE ring clockwise.
• The setting is made, and initialization commences.
Settings are not confirmed unless you perform
“INITIALIZATION”.
Initialization deletes all data in the HDD.