


17
RQT7394
Getting started
You can playback video titles on other network compatible
Panasonic DVD recorders on the Home Network.
When more than one network compatible Panasonic DVD recorder
is on the Home Network, the terms “server” and “client” are used.
The “client” is the DVD recorder that you will actually operate to
receive video titles.
The “server” is the DVD recorder that delivers video titles to your
“client”.
Make the following settings so this unit can recognize which DVD
recorder will receive the data. This unit will later function as the
server.
Preparation
≥Connect to the Home Network or another network compatible
Panasonic DVD recorder.
≥Confirm “TCP/IP Settings” is set to “Automatic (DHCP)”
(➡ page 16, step 6).
≥Give all the DVD recorders on the Home Network a unique unit
name. (➡ page 16, To change unit names)
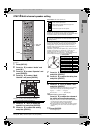
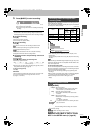
On the unit you want to use as the server
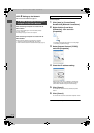
1 Press [SETUP].
2 Press [3, 4] to select “Network” and
press [1].
3 Press [3, 4] to select “Registration
of Client Unit” and press [ENTER].
The unit names of the DVD recorders on the Home Network
will be displayed after a few seconds (up to 15 units).
≥When not displayed (➡ right, “When connected DVD
recorders are not displayed–Renew”)
4 Press [3, 4] to select the DVD
recorder you want to register as a
client and press [ENTER].
“≤” indicates the registered client unit.
≥Press [ENTER] again to cancel.
≥Repeat this step to register other units as clients.
≥You can have up to 4 client units.
To show other pages
Press [3, 4, 2, 1] to select “Previous” or “Next” and press
[ENTER].
≥You can also press [:, 9] to show other pages.
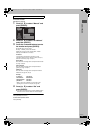
∫ When connected DVD recorders are not
displayed–Renew
In step 3 (➡ left)
1 Press [SUB MENU].
2 Press [3, 4] to select “Renew” and press
[ENTER].
The list will be updated within 15 seconds.
If any DVD recorders are not displayed despite selecting “Renew”,
add them manually (➡ below, Manually adding DVD recorders).
∫ Manually adding DVD recorders
In step 3 (➡ left)
1 Press [3, 4] to select “Add manually” and press [ENTER].
2 Press [3, 4] to select “MAC Address” and press [ENTER].
3 Press [3, 4, 2, 1] to enter the MAC Address of the unit you
want to use as the client and press [ENTER].
≥To check the MAC Address (➡ page 16, step 4).
4 Press [3, 4] to select “Unit Name” and press [ENTER].
5 Enter the name (➡ page 46).
6 Press [3, 4] to select “Add” and press [ENTER].
≥You can manually add up to 4 units.
≥“Model” is displayed in the “Model No.” column.
≥You cannot check the properties of manually added DVD
recorders.
∫ To check the properties of the DVD recorders
on the list
(You cannot do this with manually added DVD recorders.)
In step 3 (➡ left)
1 Press [3, 4] to select the DVD recorder and
press [SUB MENU].
2 Press [3, 4] to select “Properties” and press
[ENTER].
The model name, manufacturer and MAC address of the DVD
recorder will be displayed.
∫ To delete DVD recorders from the list
In step 3 (➡ left)
1 Press [3, 4] to select the DVD recorder and press
[SUB MENU].
2 Press [3, 4] to select “Delete” and press [ENTER].
3 Press [2, 1] to select “Delete” and press [ENTER].
∫ To correct the setting of manually added DVD
recorders
In step 3 (➡ left)
1 Press [3, 4] to select the manually added DVD recorder and
press [SUB MENU].
2 Press [3, 4] to select “Edit” and press [ENTER].
3 Press [3, 4] to select the item and make the correction.
4 Press [3, 4] to select “Set” and press [ENTER].
To exit the screen
Press [RETURN] several times.
To return to the previous screen
Press [RETURN].
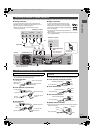
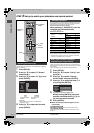
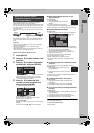
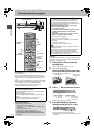
When more than one network
compatible Panasonic DVD recorder is
on the Home Network
Server Client
Router/Hub
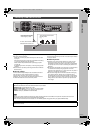
SETUP
Disc
Video
Audio
Channel
Set Up
Registration of Client Unit
Previous
No. Unit Name Model No.
01/01
Next
Add manually
01 Bedroom DMR-E500H
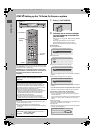
SETUP
Disc
Video
Audio
Channel
Set Up
Registration of Client Unit
Previous
(/)
No. Unit Name Model No.
01/01
Next
Add manually
01 Bedroom DMR-E500H
Renew
Delete
Edit
SETUP
Disc
Video
Audio
Display
TV Screen
Channel
Set Up
Add manually
MAC Address
Unit Name
Add
Network
✱✱
_
✱✱
_
✱✱
_
✱✱
_
✱✱
_
✱✱
Unit
Input MAC address and unit name,
then press
“
Add
”
button.
“Add manually”
screen
Renew
Delete
Properties
7394en-p16-19.fm 17 ページ 2004年7月21日 水曜日 午前10時37分