


51
RQT7394
Transfer (Dubbing)
Recording from a video cassette recorder
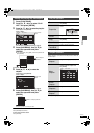
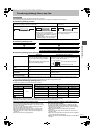
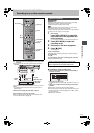
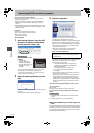
e.g.: Connecting other video equipment to the L2 or DV input
terminals
≥Turn off the unit and other video equipment before connecting.
If the audio output of the other equipment is monaural, connect to L/
MONO.
§
The S-VIDEO terminal achieves a more vivid picture than the
VIDEO terminal.
≥DV automatic recording (DV AUTO REC) ➡ page 52
When recording from the unit’s DV terminal
Select the type of audio recording from “Select Audio CH for DV
Input” in the SETUP menu (➡ page 63).
[HDD] [RAM] [DVD-R]
Preparation
≥Connect a video cassette recorder to this unit’s input terminals.
≥Press [HDD] or [DVD] to select the recording drive.
≥To adjust the audio recording level (➡ below)
[Note]
When recording using this unit’s input terminals, only the sound
received at the time of recording will be recorded.
As long as secondary audio that is recorded on the video cassette is
not output on the unit in play, it is not recorded.
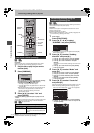
1 While stopped
Press [INPUT SELECT] to select the
input channel for the equipment you
have connected.
e.g.,If you have connected to L2 input terminals, select “L2”.
2 Press [REC MODE] to select the
recording mode.
3 Start play on the other equipment.
4 Press [¥ REC].
Recording starts.
To skip unwanted parts
Press [;] to pause recording. (Press again to restart recording.)
To stop recording
Press [∫].
To record programs to fill up the remaining space on the disc
➡ page 24, Flexible Recording
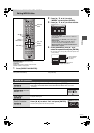
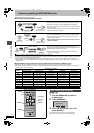
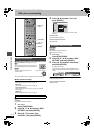
∫ To adjust the audio recording level
1 Before recording commences, press and hold [AUDIO] for
more than 3 seconds.
2 Press [3, 4] to select “L/R”.
To individually adjust a level press [3, 4] to select “L” (left) or “R”
(right).
3 Press [2, 1] to adjust the audio recording level and press
[ENTER].
≥Set the level to neutral again after recording is finished.
≥If the recording level is too high the audio will be distorted. Set it so
the audio level meter is not shaking (Maximum–10 dB to –5 dB is
an appropriate level).
≥The DV input is unaffected.
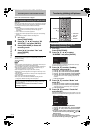
POWER
VOLUME
CH
INPUT SELECT
DVD POWER
TV
TV/VIDEO
1
HDD
SD/PC
DVD
23
456
78
0
9
CM SKIP
AUDIO
PAG E
CH
CANCEL
VCR Plus+
SKIP
STOP
PAU SE
PLAY/x1.3
SLOW/SEARCH
FUNCTIONS
ENTER
DIRECT NAVIGATOR
TOP MENU
RETURN
SUB MENU
CHAPTER
SETUP
Info
PROG/CHECK
TV GUIDE
REC MODEERASE
REC
STATUS
TIME SLIP
DISPLAY
DUBBING
AUDIO
3 4 2 1
ENTER
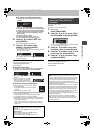
FUNCTIONS
REC MODE
¥ REC
HDD, DVD
INPUT SELECT
∫
;
HDD DVD SD PC
HDD
DVD
TIME SLIP
DRIVE SELECT
/x
1.3
OPEN/CLOSE
PC CARD
EJECT
SD CARD
POWER
DV IN
AUDIO IN
VIDEO IN
S-VIDEO IN
L2
L/MONO
R
POWERPOWER
L/MONO - AUDIO IN - R
VIDEO IN DV IN
S-VIDEO IN
Audio/Video
cable
S-Video
cable
§
Other video
equipment
Yellow White Red
DV Cable
(IEEE 1394, 4-pin)
This unit
Manual recording
Almost all videos and DVD software on sale have been
treated to prevent illegal copying. Any software that has
been so treated cannot be recorded using this unit.
Audio Recording Level
R
L
R
L/R
L
30 20 15 10 5 0 OVER
d0
d0
-¶
7394en.book 51 ページ 2004年7月20日 火曜日 午後7時26分