


5
RQT7394
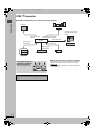
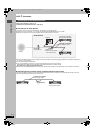
Getting started
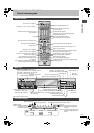
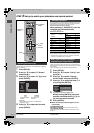
Control reference guide
Rear panel terminals (➡ page 7)
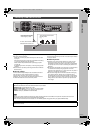
Remote control
Main unit
POWER
VOLUME
CH
INPUT SELECT
DVD POWER
TV
TV/VIDEO
1
HDD
SD/PC
DVD
23
456
78
0
9
CM SKIP
AUDIO
PAG E
CH
CANCEL
VCR Plus+
SKIP
STOP
PAU SE
PLAY/x1.3
SLOW/SEARCH
FUNCTIONS
ENTER
DIRECT NAVIGATOR
TOP MENU
RETURN
SUB MENU
CHAPTER
SETUP
Info
PROG/CHECK
TV GUIDE
REC MODEERASE
REC
STATUS
TIME SLIP
DISPLAY
DUBBING
Turn the unit on (➡ page 12)
Input select (L1, L2, L3 or DV) (➡ page 51)
Select channels and title numbers, etc./
Enter numbers
Cancel
Basic operations for recording and play
Show Top menu/Direct Navigator
(➡ page 30, 40)
Show sub menu (➡ page 40)
Show on-screen menu (➡ page 38)
Show timer recording schedule
(➡ page 26)
Erase items (➡ page 32)
Show SETUP menu (➡ page 13, 61)
Changing the size of information window
(➡ page 28)
One touch transfer (dubbing)/“Blue” button for
television program list (➡ page 48, 25)
Television operations (➡ page 14)
Select drive (HDD, DVD, SD or PC)
(➡ page 22, 30, 35)
Channel select (➡ page 22)
Select audio (➡ page 23, 32)/Adjust the audio
recording level (➡ page 51)
Skip a minute forward (➡ page 31)
Show VCR Plusr screen (➡ page 26)
Show FUNCTIONS window (➡ page 39)
Selection/Enter, Frame-by-frame (➡ page 12, 31)
Return to previous screen
Skip the specified time/Display the television image
as a picture-in-picture (➡ page 24, 31)
Show television program list (➡ page 25)
Change recording mode (➡ page 22)
Start recording (➡ page 23)
Show status messages (➡ page 39)
Create chapters/“Green” button for television program
list (➡ page 32, 25)
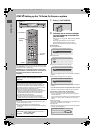
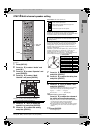
HDD DVD SD PC
HDD
DVD
TIME SLIP
DRIVE SELECT
/x
1. 3
OPEN/CLOSE
PC CARD
EJECT
SD CARD
POWER
CH
REC
TIME SLIP
DV IN
AUDIO IN
VIDEO IN
S-VIDEO IN
L2
L/MONO
R
POWER
SD/PC card slots (➡ page 34)
Connection for camcorder, etc. (➡ page 51)
Skip the specified time/Display the television image
as a picture-in-picture (➡ page 24, 31)
Channel select (➡ page 22)
Display (➡ below)
Start recording (➡ page 23)
POWER button (POWER
Í
/I) (➡ page 12)
Press to switch the unit from on to standby mode or
vice versa. In standby mode, the unit is still
consuming a small amount of power.
Disc tray (➡ page 22, 30)
Stop (➡ page 23, 31)
Remote control signal sensor/
Open/close disc tray (➡ page 22, 30)
Time Slip indicator (➡ page 24)
Select drive (➡ page 22, 30, 35)
Lights when the HDD or DVD
drive is selected
Connection for digital video
(DV) camcorder (➡ page 51)
Start play
(➡ page 30)
Lights when the HDD, DVD, SD or PC
drive is selected
Skip/Slow/Search
(➡ page 31)
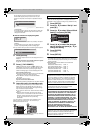
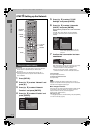
The unit’s display
HDD
SDPC
XP
SP
CH
LP
EP
REC
PLAY
DVD
VCD
.MIX
R
-
AM
REC
PLAY
MPEG4
EXT
Link
REC
PLAY
DVD
D
.MIX
R
-
AM
REC
EXT
Link
REC
PLAY
EXT
Link
REC
PLAY
MPEG4 indicator
When lit: Simultaneous MPEG4
recording function is
activated (➡ page 22).
Main display section
D.MIX (multi-channel DVD-Audio only)
When lit: Down-mixing (➡ page 68) is
possible.
When off: The disc prevents down-mixing
(➡ page 20, Regarding DVD-
Audio).
Channel
Recording
Playback
Recording/Playback
Timer recording indicator
Disc type
Transferring (dubbing)/Network function indicator
Recording mode
e.g.,
[HDD]
HDD/Card indicator
7394en.book 5 ページ 2004年7月20日 火曜日 午後7時26分