


Chapter 1 Overview
Chapter 1 Overview 17
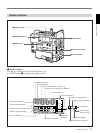
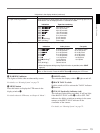
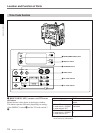
3 AUDIO LEVEL (CH-1/CH-2) (audio recording
level adjustment for channels 1 and 2) knobs
When the AUDIO SELECT (CH-1/CH-2) switches 4
are set to MANUAL, these knobs adjust the audio
levels being recorded on channels 1 and 2.
The audio levels are indicated in the display window. For
details, see “1 Display window” in “Display Section on
page 11.
4 AUDIO SELECT (CH-1/CH-2) (audio recording
level adjustment manual/auto selection for channels
1 and 2) switches
These select the audio recording level adjustment
method.
AUTO: Use the AGC (automatic gain control) circuit
to automatically adjust the audio level.
MANUAL: Enables users to manually adjust the
AUDIO LEVEL (CH-1/CH-2) knobs for each
channel. Select AUTO if excess input levels are
likely to occur.
5 AUDIO IN (CH-1/CH-2) (audio input selection
for channels 1 and 2) switches
These select the input signals to channels 1 and 2.
CAM: Signals from the microphone connected to the
camera’s MIC IN +48V connector or from the
camera’s built-in microphone.
REAR: Signals from a microphone or external
equipment connected to the AUDIO IN (CH-1/CH-
2) connectors.
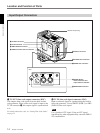
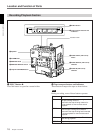
6 Speaker
Outputs the recorded or playback audio. When a
warning indicator appears in the viewfinder or display
window, the speaker sounds a warning tone.
The speaker is muted (does not output a warning tone)
when an earphone is connected to the EARPHONE
connector.
For details on the warning tone, see “Warning System”
(page 72).
7 ALARM (alarm tone volume adjustment) knob
This controls the volume of the warning tone that is
output via the speaker 6 or earphone. Turning this
knob to the minimum setting mutes the alarm tone.
8 MONITOR (monitor volume adjustment) knob
This controls the volume of the sound other than the
warning tone that is output via the speaker 6 or
earphone. Turning this knob to the minimum setting
mutes the audio output.
9 MONITOR SELECT (audio monitor selection)
switch
This selects audio output via the speaker 6 or
earphone.
CH-1: Channel 1 audio
MIX: Mixed audio (channels 1 and 2)
CH-2: Channel 2 audio
0 ClipLink CONTINUE button
When restart ClipLink shooting, press this button to
add the new clip at the end of the recorded clips.
Note
If you restart recording without pressing this button,
the pre-recorded ClipLink log data and index pictures
are deleted.
For details, see Chapter 5 “ClipLink Shooting”.