Chapter 3 Shooting
42 Chapter 3 Shooting
Manually adjusting audio recording level
1 In step 3 above (“Shooting”), set the AUDIO SELECT (CH-1/CH-2)
switches to MANUAL (see page 40).
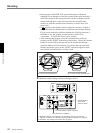
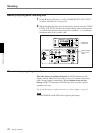
2 While checking the audio level in the display window, turn the AUDIO
LEVEL (CH-1/CH-2) knob for the channel being used for microphone
or wireless microphone system connection (channel 1 or 2) so that the
maximum audio level is under 0 dB.
When the battery is getting exhausted
When the battery is getting exhausted, the BATT indication in the
display window blinks once a second (see page 12). Replace the battery
with a charged battery immediately. If you continue to use the low
battery, the BATT indication will blink four times a second, and the
operation will stop.
For description of how to replace batteries, see “Power Supply” on page 31.
Note
Turn the POWER switch OFF before replacing the battery.
Audio level
indications
AUDIO LEVEL
(CH-1/CH-2)
knobs
∞
H MIN SEC FRM
1
dB
2
PB DATE NDF EXT-LK HOLD
CLIP
TAPE
BATT
DIAG
EF
RF SERVO HUMIDSLACK
Li
-
-40
-30
-12
0
IP
CL
CONT
OVER OVER
WARNING
RESET
(MENU SET)
MENU ADVANCE SHIFT
ALARM
MONITOR
PRESET
DATE/TIME
ClipLink CONTINUE
MONITOR SELECT
BACK TALLY
LIGHT
DISPLAY
AUDIO LEVEL
AUDIO SELECT
AUDIO IN
CH-2
CH-1
OFF
ON
MIX
REGEN SET
F-RUN
R-RUN
AUTO
MANUAL
CAM
REAR
ON
OFF
COUNTER
TC
U-BIT
CH-1 CH-2
-20
DVCAM
F
8
32k
F
8
48k
Shooting


