


22
BRIGHTNESS
Use this control to adjust the darker areas of the picture (black level),
without significantly affecting bright areas. For correct adjustment it
may prove useful to display a grey scale with at least twenty bands.
Now try to reduce the brightness of the black band as much as pos
-
sible while ensuring that it can still be distinguished from the adjacent
band with brightness slightly higher than black. Alternatively use a
scene composed of black objects alongside other dark coloured
objects and try to keep all the objects separately identifiable.
CONTRAST
Use this control to adjust the brighter areas of the image (white level),
without significantly affecting dark areas. For correct adjustment it
may prove useful to display a grey scale with at least twenty bands.
Now try to increase the brightness of the white band as much as
possible while ensuring that it can still be distinguished from the
adjacent band with brightness slightly less than white. Alternatively
use a scene composed of well-lit white objects surrounded by light
coloured objects with lower level lighting, and try to ensure that all
the objects remain separately identifiable.
COLOUR
This control (also called Saturation) increases or decreases the
picture colour intensity. When set to zero, colour images will be
shown in black and white. Increasing the value, try to find the point
at which the colours look natural: suitable references include skin
tones and grass in landscape shots.
TINT
Controls the purity of colours. Basically determines the red-green
ratio of the picture.
Reducing the value will boost the red contents of the picture, in
-
creasing it will boost the green tones. For this adjustment use skin
tones or a test card image with colour bars as a reference.
SHARPNESS
This adjustment serves to modulate the signal to increase or
decrease the level of picture detail. When the sharpness value is
reduced the image details appear less pronounced, while increas-
ing the value raises image definition, making the outline of objects
sharper. Note that an excessively high value may result in a ‘noisy’
picture and the edges of objects may appear unnaturally clearly
defined.
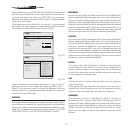
Some adjustments (e.g.
BRIGHTNESS
and
CONTRAST
) are associated
with a numerical value that can be varied within the set limits us-
ing the
▶
and
◀
keys. For others (e.g.
VIDEO TYPE
) you can choose
between two options presented on the same line (and selectable
using the
▶
and
◀
keys).
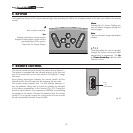
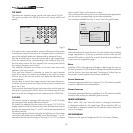
Other adjustments (identified by by the symbol <) are associated
with submenus, which appear as a superimposed window in which
the selection is made with the
▲
and
▼
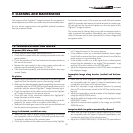
keys (Fig.23).
Fig. 23A
Fig. 23B
These submenus are accessed by pressing the < key. To quit the
submenu and return to the higher level press the
MENU+/-
keys.
Press
ESC
on the remote control or keypad to abandon the menu
display or wait for it to disappear automatically after the number of
seconds set in the
SETUP
page.
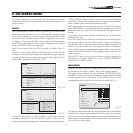
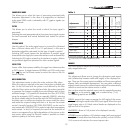
PICTURE
This menu features the adjustments related to picture quality. Adjust
-
ments that are not available for a specific input will not be displayed
on the menu. Table 3 summarises the adjustments available for each
input. For a complete overview of the on-screen menus, consult
‘ON
SCREEN MENU LAYOUT
’ in the
“ADDITIONAL INFORMATION”
section.