


23
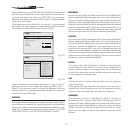
SHARPNESS MODE
This allows you to select the type of processing associated with
sharpness adjustment. In the case of a progressive or interlaced
video signal
VIDEO
mode is advisable; with PC graphic signals use
GRAPHIC
mode .
FILTER
This allows you to select the mode in which the input signal is
processed.
Selecting the most appropriate value for a given input signal ensures
the best horizontal and vertical definition and makes the picture
sharper.
CINEMA MODE
Use this option if the video signal source is a movie film (obtained
from a Teleciné device with 3:2 or 2:2 pull-down). In this case a
deinterlace algorithm optimized for this type of signal is applied.
Selecting
AUTO
mode causes the de-interlacer to analyse signal
characteristics and apply the correct deinterlace mode automatically.
Selecting the NO option causes the de-interlacer to apply a Motion
compensated algorithm optimized for video camera signals.
VIDEO TYPE
Inserts a filter that improves stability of images from videorecorders
or DVD players. To toggle between NORMAL and VCR mode, press
the
key on the remote control or select the value on the On
Screen Display.
NOISE REDUCTION
This adjustment serves to select the noise reduction filter value.
When the option is selected in the menu the picture is divided into
two. On the left hand side the picture is not affected by the filter
while the filter is active on the right hand side; this makes it possible
to compare the changes resulting from noise filtration with a clean
unfiltered image. I t is possible to deactivate the filter
(NOT ACTIVE)
using the automatic (
AUTO
) setting or manually
(MANUAL)
selecting
the most suitable value for the picture with the
VALUE
adjustment. In
this latter case it is sufficient to position the cursor under the values
and make the required setting with the
▶
e
◀
keys on the remote
control. A specific function
(SKIN TONES ADJUSTMENT)
can be used in
conjunction with
NOISE REDUCTION
in order to make skin tones appear
more natural. In fact, it is frequently the case that the reduction of
noise is accompanied by a slight degradation of the picture in skin
tone areas, while using this function makes it possible to obtain
optimum quality of the entire picture.
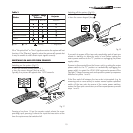
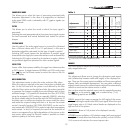
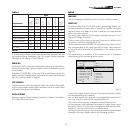
Table 3
ideo Standard is NTSC
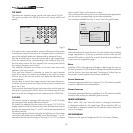
IMAGE
This menu features adjustments relating to picture position, aspect
ratio, magnification etc.
ASPECT
This adjustment allows you to change the dimensions and aspect
ratio (relationship between width and height) of the displayed im-
age. There are five preset aspects available and three personalised
aspects (with user-settable parameters). You can select a different
aspect for each source: the selected aspect ratio will be automatically
called the next time the relative source is called.
You can also select the required aspect ratio by repeatedly pressing
the key, or by pressing and a numerical key (1...8).
The following aspects are available.
NORMAL:
projects the image occupying the full height of the screen
while maintaining the aspect ratio of the input signal. When the input
signal aspect ratio is 4:3 black vertical bands are displayed on the
right and left of the picture.
ANAMORPHIC:
allows a 16:9 picture to be displayed correctly.
LETTERBOX:
serves to display a 4:3 letterbox image (with source signal
having black bands above and below the picture) so that it fills the
16:9 screen and maintains the correct aspect ratio.