


Chapter 1 Overview 9
Chapter 1 Overview
(Continued)
........................................................................................................................................................................................
1) “EE” stands for “Electric to Electric.” In EE mode, the video and audio signals input to the VCR’s recording circuitry do not
pass through any magnetic conversion circuits but are output via electric circuits only. This mode is used to check the input
signals and adjust input levels. The pictures output in EE mode are referred to as EE pictures.
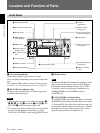
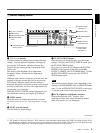
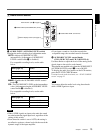
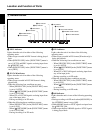
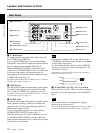
1 Monitor display section
a J/j/K/k buttons
Use these buttons in making menu settings and other
settings. You can adjust the brightness of images by
pressing the J/j buttons, while the relevant data
(format, the tape running mode) is displayed on the
LCD screen.
The display of the brightness level adjustment
disappears within a second after the adjustment
completes.
While the time counter is displayed, you can move the
position of the time counter up or down by pressing
J/j buttons. When the small size time counter is
displayed, the position of the time counter can be moved
not only up and down, but also to the right and left by
pressing the K/k buttons.
While the STATUS CHECK screen is displayed, you
can switch the screen by pressing the J/j buttons.
b MENU button
Press this button to display the menu list on screen.
For details on the menus, see “Operating Menus” on page
68.
c EXEC (execute) button
Use this button in menu settings.
d STATUS CHECK button
Press this button to check the audio level and menu
settings. To display the STATUS CHECK screen, press
the STATUS CHECK button.
Every time you press the J/j buttons, the STATUS
CHECK screen switches in the order of AUDIO,
OUTPUT, ASSIGN, and CUSTOM REPEAT. To hide
the STATUS CHECK screen, press the STATUS
CHECK button again.
The audio level meter display varies depending on the
settings of [AUDIO MODE] in the [AUDIO SET] menu
(page 76), the AUDIO OUTPUT SELECT switch (page
7), and the audio mode on the tape played back.
e LCD (Liquid Crystal Display) monitor
Display the playback or EE
1)
pictures. Also,
superimposed time data, status information, menus,
audio level meters, etc., are displayed.
6 RESET (Counter
reset) (A3) button
8 DISPLAY button
2 MENU button
7 COUNTER SELECT
button
4 STATUS CHECK
button
1 J/j/K/k buttons
5 LCD (Liquid Crystal
Display) monitor
3 EXEC (execute) button
4 Indicator section
(see page 14)
2 Tape transport
control section
(see page 11)
Note