


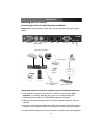
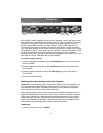


4. Insert the female VGA connector on the opposite end of the integrated KVM cable to
the Video (IN) port on the rear panel of the SV1115IPEXT.
5. Connect a USB Type A to B cable to the USB port on the rear panel of the KVM.
6. Connect the opposite end of the USB Type A to B cable to an available USB port on
the managed computer.
7. Using a Category 5 Ethernet patch cable, connect the LAN connector on the rear
panel of the SV1115IPEXT to a network data jack (usually on a hub, switch, router, or
pre-wired wall jack).
8.
Optional
: If needed, connect the WAN connector on the rear panel of the
SV1115IPEXT to a network data jack (usually a hub, switch, router, or pre-wired wall
jack).
9. Important: If you want to continue to use the host computer locally, skip step 11 and
go directly to Connecting a Local Keyboard, Mouse, and Monitor (next page) after
completing step 10. Otherwise, complete step 11 now and continue to the section
entitled Configuring SV1115IPEXT (page 7).
10. Connect the power cord (provided) to an appropriate electrical outlet, plug the
opposite end of the power cord into the AC/DC adapter, and plug the power
connector into either the DC-in or DC-in-2 ports on the rear panel of the unit. The
LED underneath the power connectors will be solid green when the unit is powered.
11. Power on the host computer.
NOTE: If you are using cables other than those provided in the SV1115IPEXT package
or branded by StarTech.com, ensure that the cables are of high quality and use the
minimum possible distance necessary. Low quality or excessively long (particularly
video) cables between the host computer and the SV1115IPEXT could degrade
performance.
NOTE: In the event that you do not have enough integrated USB ports available on the
managed computer to directly connect the keyboard, mouse, and SV1115IPEXT, you
may use a high-quality USB hub on one of the computer’s USB ports to make all of the
connections.
IMPORTANT: The SV1115IPEXT is convection-cooled. As such, please ensure the
vents on both sides are unobstructed.
Instruction Manual
5