


KVM cable as the male VGA connection you completed in the previous step.
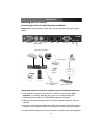
5. Insert the connectors on the opposite end of the integrated KVM cable (female VGA
monitor connector, keyboard, mouse) to the Video (IN), Host Keyboard, Host Mouse
ports on the rear panel of the SV1115IPEXT as appropriate.
6. Using a Category 5 Ethernet patch cable, connect the LAN connector on the rear
panel of the SV1115IPEXT to a network data jack (usually on a hub, switch, router, or
pre-wired wall jack).
7.
Optional
: If needed, connect the WAN connector on the rear panel of the
SV1115IPEXT to a network data jack (usually a hub, switch, router, or pre-wired wall
jack). For more information on the WAN port, please refer to the section
Configuring SV1115IPEXT (page 7) for important information.
8. Important: If you want to continue to use the host computer locally, skip step 10 and
go directly to “Connecting a Local Keyboard, Mouse, and Monitor” after completing
step 9. Otherwise, complete steps 9 and 10 now and continue to Configuring
SV1115IPEXT (page 7).
9. Connect the power cord (provided) to an appropriate electrical outlet, plug the
opposite end of the power cord into the AC/DC adapter, and insert the power
connector into either the DC-in or DC-in-2 port on the rear panel of the unit. The LED
underneath the power connectors will be solid green when the unit is powered.
IMPORTANT: If you wish to add power redundancy to the unit, simply connect the
optional second AC/DC adapter to the unit following the instructions in step 9 above.
This provides a load-balancing feature between the two power sources and allows the
unit to function if one adapter fails. *Please note: The ad
ditional power supply used
with SV1110IPEXT can NO
T be used with SV1115IPEXT.
10. Power on the host computer.
Follow these instructions if the host computer uses a USB keyboard and mouse:
IMPORTANT: Not all computers fully support USB mice and keyboards and recognize
them on startup. It is strongly recommended that you test the USB devices you will use
with the host computer before configuring the SV1115IPEXT. If the computer does not
work properly with USB devices, you can attempt to update the computer’s BIOS to the
most recent version to see if it adds USB input device functionality. Consult your
computer manufacturer for details.
1. Power down the computer to which the SV1115IPEXT will be connected (
host
computer
). If purchased, install the unit in your rack or cabinet following the
instructions that came with the 1110EXTRACK (optional, not included).
2. If present, disconnect the existing monitor and USB keyboard/mouse from the host
computer.
3. Using the provided integrated KVM cable, locate the end with the male VGA (monitor)
connector and connect it to the VGA-out connector on the back of the host computer.
Instruction Manual
4