


21
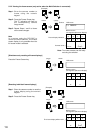
Operation mode*
(Refer to p. 24) Designates the unit as a master or slave.
Switcher*
(Refer to p. 25) Determines the type of switcher to be connected to the unit.
Contact point
(Refer to p. 26)
Sets the Alarm Contact Output Terminal's operation.
(Only valid when "MASTER" has been selected in the "Option mode" setting.)
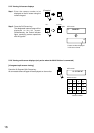
Automatic reset
(Refer to p. 27)
Sets the function to automatically return the camera to a specified (Home)
position after operation completion.
Home position
(Refer to p. 28) Sets the Combination camera's standby status.
I/O speed*
(Refer to p. 29) Sets the transfer rate of each control terminal.
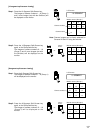
Buzzer*
(Refer to p. 30) Sets whether or not to sound a buzzer when an alarm is engaged.
Initial screen
(Refer to p. 30)
Sets the screen to be displayed on the monitor immediately after the
power is switched ON.
Channel designation
(Refer to p. 31)
Sets the channel (camera number) to be displayed first when the power is
switched ON.
Sensor alarm
(Refer to p. 32) "ON" when using the Sensor Alarm function.
Camera alarm
(Refer to p. 32) "ON" when using the Combination camera's alarm contact input.
Camera check
(Refer to p. 33)
Checks the Combination camera connected to the camera control terminal
for 30 seconds.
Camera alarm preset
(Refer to p. 34)
Sets the position number and direction in which the Combination camera
will automatically face when an alarm signal is received from the camera.
(Only valid when "ON" has been selected in the "Camera alarm" setting.)
Alarm signal
(Refer to p. 35) Sets the type of alarm activation signal.
Alarm interval
(Refer to p. 35) Sets the time interval from alarm signal reception to reset.
Alarm function
(Refer to p. 36)
Sets the monitor display method when an alarm signal is received.
(Only valid when "EDGE" has been selected in the "Alarm signal" setting.)
Alarm hold
(Refer to p. 36) Sets the monitor display to be switched when an alarm signal is received.
Function key
(Refer to p. 37)
Displays the corresponding preset camera image (camera number and
position number) on the monitor.
Abbreviation
(Refer to p. 38)
Displays the corresponding preset camera image (camera number and
position number) on the monitor when the abbreviated number (entered
with the numeric keypad) is entered, followed by the SET key.
Tour sequence
(Refer to p. 39)
Sequentially displays two or more camera outputs on full screen in order of
reproduction (1 – 128) at preset time interval (seconds).
Camera menu
(Refer to p. 40)
Calls up the camera's built-in menu screen, permitting various
Combination camera settings, such as present position.
Password
(Refer to p. 40) Sets the password required to open the menu.
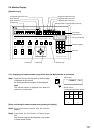
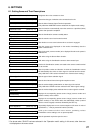
6. SETTINGS
6.1. Setting Items and Their Descriptions
* Can be set when "SLAVE" has been selected in the "Operation mode" setting. In this event, other items are
not displayed on the menu screen.