


Color Active-Matrix LCD Touch Panels Installing Touch Panels 7
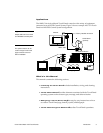
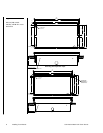
AXU-CV(/PB) or AXU-CA(/PB) and BB-TP1 (solid surfaces)
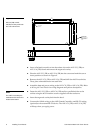
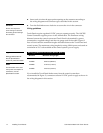
Mount the AXU-CV(/PB) or AXU-CA(/PB) and BB-TP1 (Figure 6) into a solid
surface:
Release slot
Solid surface mounting
flanges
Knockout
BB-TP1 UniMount Back Box enclosure
AXU-CV/PB or
AXU-CA/PB bezel
Engraved overlay
Stud mounting
holes
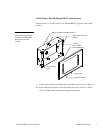
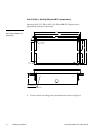
1. Cut the solid surface according to the cutout dimensions shown in Figure 7.
2. Insert a flat head screwdriver into the release slot on the AXU-CV(/PB) or
AXU-CA(/PB)’s bezel and remove the engraved overlay.
Figure 6
AXU-CV/PB or AXU-CA/PB
and BB-TP1 UniMount Back
Box enclosure for solid
surfaces