


111
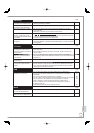
RQT9431
You can improve sound quality by connecting this unit to an
amplifier or system component using the audio cable or the
digital audio cable (optical/coaxial).
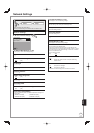
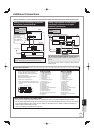
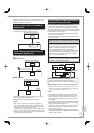
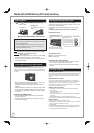
Using an Audio Cable (not included) for
Better Sound
Use this connection to play sound through speakers
connected to an amplifier or system component.
This unit
AUDIO IN
RL
R - AUDIO - L
OUT
Amplifier or System Component
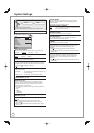
Using a Optical Digital Audio Cable (not
included) for Better Sound
This method allows you to enjoy multi-channel surround
sound.
■ With OPTICAL
OPTICAL
OPTICAL IN
Insert fully with this side up.
Do not bend cable sharply.
This unit
Amplifier or System Component
■ With COAXIAL
COAXIAL
COAXIAL IN
This unit
Amplifier or System Component
Connect an amplifier or system component with a built-in
Dolby Digital, DTS or MPEG decoder.
Adjust settings in “Digital Audio Output” (➔ 100).
Notes
When this unit is connected to an amplifier with a digital audio
cable and connected to a television with an HDMI cable, you can
enjoy the highest quality of audio from the disc by setting “HDMI
Audio Output” to “Off” in the Setup menu (➔ 102).
In this case audio is only output from the ampl fier not the television.
You cannot use DTS Digital Surround decoders not meant for DVD.
Before purchasing an optical digital audio cable, check the terminal
shape of the equipment to be connected.
•
•
•
•
•
Connecting with an HDMI (High Definition
Multimedia Interface) Terminal
When connected to an HDMI compatible unit, an
uncompressed digital audio and video signal is transmitted,
enabling you to enjoy high quality, digital video and audio
with just one cable. When connecting to an HDMI-compatible
HDTV (High Definition Television), the output can be switched
to 1080p, 1080i or 720p HD video.
Please use High Speed HDMI Cables that have the HDMI
logo (as shown on the cover).
When outputting 1080p signal, please use the HDMI cables
5.0 meters or less.
Regarding VIERA Link “HDAVI Control
TM
” function
When connecting with a Panasonic TV (VIERA) or a
receiver equipped with the “HDAVI Control” function, linked
operations would be possible. [➔ 84, Linked Operations
with the TV (VIERA Link “HDAVI Control™”/Q Link)]
Non-HDMI-compliant cables cannot be utilized.
It is recommended that you use Panasonic’s HDMI cable.
Recommended part number: RP-CDHG10 (1.0 m), RP-
CDHG15 (1.5 m), RP-CDHG20 (2.0 m), RP-CDHG30
(3.0 m), RP-CDHG50 (5.0 m), etc.
•
•
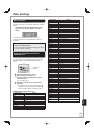
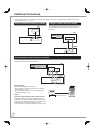
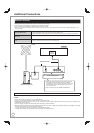
Using an HDMI (High Definition Multimedia
Interface) Cable (not included)
HDMI AV OUT
AV1(TV)
HDMI OUT
HDMI IN
Receiver
AV
HDMI IN
TV
This unit
Set “HDMI Audio Output” to “On” (➔ 102). (The default setting is
“On”.)
To enjoy High Quality Video up-converted to 1080p, you need to
connect the unit to 1080p compatible HDTV and set “HDMI Video
Format” in the Setup menu to “1080p” (➔ 102).
Notes
If connecting to equipment that is only compatible with 2
channel audio output, audio with 3 channels or more will
be down-mixed (➔ 134) and output as 2 channels, even
if connecting with an HDMI cable (some discs cannot be
down-mixed).
For display units compatible with HDCP (High-Band width
Digital Content Protection) that are equipped with a digital
DVI input terminal (PC monitors, etc.):
Depending on the unit, picture may not display properly or
at all when connecting with a DVI/HDMI switching cable
(audio cannot be output).
If you connect a DVI device that is not compatible
with HDCP, set “HDCP on HDMI Output” in the Setup
menu to “Off” (➔ 102).
•
•
•
•
•
•
•
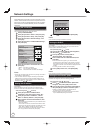
Connecting with a Panasonic TV (VIERA)
If the 21-pin Scart cable is connected, the Direct TV
Recording and Pause Live TV function is available. (➔ 37)
Reference