


61
RQT9431
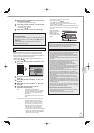
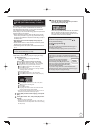
Copying a finalised DVD-R, DVD-R DL,
DVD-RW (DVD-Video format), +R and +R
DL
DVD-V → HDD
You can copy the content of finalised DVD-R, DVD-R DL,
DVD-RW (DVD-Video format), +R, and +R DL to the HDD
and re-edit the content copied to the HDD.
While playing a disc, the content being played is copied to the
HDD according to the set time.
When “Recording Format for DVD” (➔ 98) is set to “Video
format” and you make a copy, the copy will be made using
the picture size selected in “Aspect for Recording” (➔ 98) of
the Setup menu.
Operations and on screen displays during copy are
also recorded.
Almost all DVD-Video on sale have been treated to prevent
illegal copying, and cannot be copied.
The following cannot be copied:, Video CD, Audio CD and
so on.
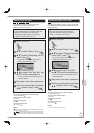
Preparation:
Insert the finalised disc (➔ 118).•
After performing steps − (“Format” is automatically set to
“DVD-Video”) (➔ 59, Copying using the copying list−Copy)
Set “Copy Time”.
If you are not going to change the setting
(➔ step
).
Setting the unit to copy according to the set time
Press [
e
,
r
] to select “Copy Time”, then press [
q
].
Press [
e
,
r
] to select “Time Setting”, then press [OK].
Setting the unit to copy all the content on the disc
Press [
e
,
r
] to select “Off”, then press [OK].
Press [
w
] to confirm.
Copy will continue until there is not enough available
recording space on the HDD.
Setting the copying time
Press [
e
,
r
] to select “On”, then press [OK].
Press [
e
,
r
] to select “Copy Time”, then press [OK].
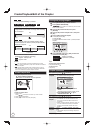
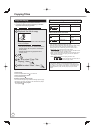
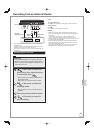
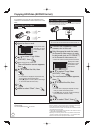
Copy
1
2
3
Cancel All
Copy Direction
Copy Mode
Copy Time
HDD DVD
DVD Video SP
Hour
Set the time a few minutes longer.
2
Min.
00
Press [
w
,
q
] to select “Hour” or “Min.”, then press
[
e
,
r
] to set the recording time.
Press [OK].
Press [
w
] to confirm.
Copying to the HDD continues for the set time even
after the content being played finishes.
Set a few minutes longer than the source title, in order to
include the operation time before play begins.
Press [
e
,
r
] to select “Start Copying”, then press
[OK].
Press [
w
] to select “Yes”, then press [OK] to start
copying.
The disc top menu is displayed.
Disc play automatically begins from title 1 when “Title 1” is
selected from the “Auto-Play Select” menu when finalising
the disc (➔ 94).
•
•
•
•
–
–
–
–
–
–
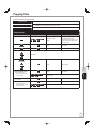
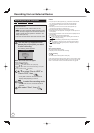
8
When the top menu is displayed
Press [
e
,
r
,
w
,
q
] to select the title you want to
start copying, then press [OK].
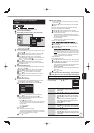
My favourite 01/02
01
Chapter 1
03
02
04
06
Chapter 2
Chapter 3 Chapter 4
While playing in order, all the titles after the selected
title are recorded until the set time. (After the last
title on the disc has finished playing the top menu is
recorded until the set time is reached.)
Tips
To return to the previous screen in steps −
Press [BACK/RETURN ].
To stop copying after step
Press [
g
].
You can also press and hold [BACK/RETURN
] for 3
seconds to stop copying.
If stopped partway, copying will be up to that point.•
Notes
The screen on the right is recorded at the beginning.
The content is recorded as 1 title from the start of copy to
the end.
If play does not begin automatically
or if the top menu does not display
automatically, press [
q
] (PLAY) to start.
Even if you copy a high quality video/audio
DVD, the original picture and audio quality
cannot be exactly replicated.
If you want to copy a title from a DVD-RW (DVD Video
Recording format), create a copying list and then copy (➔
59, Copying using the copying list
−
Copy).
•
•
•
•
•
Copying