


Service Modes, Error Codes, and Fault Finding
EN 34 Q549.2E LA5.
2009-May-08
5.9 Software Upgrading
5.9.1 Introduction
The set software and security keys are stored in a NAND-
Flash, which is connected to the PNX8543 via the PCI bus.
It is possible for the user to upgrade the main software via the
USB port. This allows replacement of a software image in a
stand alone set, without the need of an E-JTAG debugger. A
description on how to upgrade the main software can be found
in the DFU.
Important: When the NAND-Flash must be replaced, a new
SSB must be ordered, due to the presence of the security keys!
(copy protection keys, MAC address, ...).
Perform the following actions after SSB replacement:
1. Set the correct option codes (see sticker inside the TV).
2. Update the TV software => see the eUM (electronic User
Manual) for instructions.
3. Perform the alignments as described in chapter 6 (section
6.5 Reset of Repaired SSB
).
4. Check in CSM if the HDMI key, MAC address.. are valid.
For the correct order number of a new SSB, always refer to the
Spare Parts list!
5.9.2 Main Software Upgrade
• The “UpgradeAll.upg” file is only used in the factory.
• The “FlashUtils.upg” file is only used by service centra
which are allowed to do component level repair on the
SSB.
Automatic Software Upgrade
In “normal” conditions, so when there is no major problem with
the TV, the main software and the default software upgrade
application can be upgraded with the “AUTORUN.UPG”
(FUS part of the one-zip file: e.g. 3104 337 05661 _FUS
_Q5492_ 1.26.15.0_commercial.zip). This can also be done by
the consumers themselves, but they will have to get their
software from the commercial Philips website or via the
Software Update Assistant in the user menu (see eUM). The
“autorun.upg” file must be placed in the root of the USB stick.
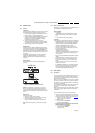
How to upgrade:
1. Copy “AUTORUN.UPG” to the root of the USB stick.
2. Insert USB stick in the set while the set is in ON MODE.
The set will restart and the upgrading will start
automatically. As soon as the programming is finished, a
message is shown to remove the USB stick and restart the
set.
Manual Software Upgrade
In case that the software upgrade application does not start
automatically, it can also be started manually.
How to start the software upgrade application manually:
1. Disconnect the TV from the Mains/AC Power.
2. Press the “OK” button on a Philips TV remote control or a
Philips DVD RC-6 remote control (it is also possible to use
a TV remote in “DVD” mode). Keep the “OK” button
pressed while reconnecting the TV to the Mains/AC Power.
3. The software upgrade application will start.
Attention!
In case the download application has been started manually,
the “autorun.upg” will maybe not be recognized.
What to do in this case:
1. Create a directory “UPGRADES” on the USB stick.
2. Rename the “autorun.upg” to something else, e.g. to
“software.upg”. Do not use long or complicated names,
keep it simple. Make sure that “AUTORUN.UPG” is no
longer present in the root of the USB stick.
3. Copy the renamed “upg” file into this directory.
4. Insert USB stick into the TV.
5. The renamed “upg” file will be visible and selectable in the
upgrade application.
Back-up Software Upgrade Application
If the default software upgrade application does not start (could
be due to a corrupted boot 2 sector) via the above described
method, try activating the “back-up software upgrade
application”.
How to start the “back-up software upgrade application”
manually:
1. Disconnect the TV from the Mains/AC Power.
2. Press the “INFO”-button on a Philips remote control or
“CURSOR DOWN” button on a Philips DVD RC-6 remote
control (it is also possible to use a TV remote in “DVD”
mode). Keep the “INFO”-button (or “cursor down” button)
pressed while reconnecting the TV to the Mains/AC Power.
3. The software upgrade application will start.
5.9.3 Stand-by Software Upgrade via USB
In this chassis it is possible to upgrade the Stand-by software
via a USB stick. The method is similar to upgrading the main
software via USB.
Use the following steps:
1. Create a directory “UPGRADES” on the USB stick.
2. Copy the Stand-by software (part of the one-zip file, e.g.
StandbySW_CFT72_88.0.0.0.upg) into this directory.
3. Insert the USB stick into the TV.
4. Start the download application manually (see section “
Manual Software Upgrade”.
5. Select the appropriate file and press the “OK” button to
upgrade.
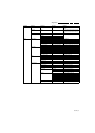
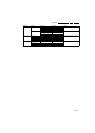
5.9.4 Content and Usage of the One-Zip Software File
Below the content of the One-Zip file is explained, and
instructions on how and when to use it.
• BootProm_PNX5120_Q5492_x.x.x.x.zip. A programmed
device can be ordered via the regional Service
organization.
• Ceisp2padll_P2PAD_x.x.x.x.zip. Not to be used by
Service technicians. For ComPair development only.
• DDC_Q5492_x.x.x.x.zip. Contains the content of the VGA
NVM. See ComPair for further instruction.
• EDID_Q5492_x.x.x.x.zip. Contains the EDID content of
the different EDID NVM’s. See ComPair for further
instructions.
• EJTAGDownload_Q5492_x.x.x.x.zip. Only used by
service centra which are allowed to do component level
repair.
• FUS_Q5492_x.x.x.x_commercial.zip. Contains the
“autorun.upg” which is needed to upgrade the TV main
software and the software download application.
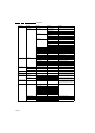
• Factory_Q5492_x.x.x.x_commercial.zip. Only for
production purposes, not to be used by Service
technicians.
• FlashUtils_Q5492_x.x.x.x_commercial.zip. Not to be
used by Service technicians.
• MOP_RAC3_x.x.x.x.zip. Contains the MOP local contrast
software and is upgradeable via USB (UPG). This SW is
not part of the FUS autorun.upg!
• OAD_Q5492_x.x.x.x.zip. Not to be used by Service
Technicians.
• OpenSourceFile_Q5492_x.x.x.x.zip. Not to be used by
Service technicians.
• PQPrivate_Q5492_x.x.x.x.zip. Not to be used by Service
technicians.
• StandbySW_CFTxx_x.x.x.x_commercial.zip. Contains
the Stand-by software in “upg” and “hex” format.
– The “StandbySW_xxxxx_prod.upg” file can be used to
upgrade the Stand-by software via USB.
– The “StandbySW_xxxxx.hex” file can be used to
upgrade the Stand-by software via ComPair.