


Alignments
EN 38 Q549.2E LA6.
2009-May-08
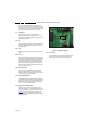
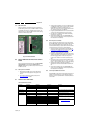
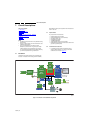
6.5.1 SSB identification
Whenever ordering a new SSB, it should be noted that the
correct ordering number (12nc) of a SSB is located on a sticker
on the SSB. The format is <12nc SSB><serial number>. The
ordering number of a “Service” SSB is the same as the ordering
number of an initial “factory” SSB.
Figure 6-1 SSB identification
6.6 Service SSB delivered without main software
loaded
Due to a changed manufacturing process, new Service SSB’s
can be delivered to the warehouse without main TV
software loaded. Below you find the steps to follow when such
an SSB is received.
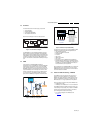
6.6.1 When a picture is available
1. Mount the Service SSB into the TV set. After start-up,
normally the download application will appear on the
screen.
2. Download the latest main software (FUS) from the
www.p4c.philips.com
website.
3. Create a folder "upgrades" in the root of a USB stick (size
> 50 MB) and save the "autorun.upg" file in this "upgrades"
folder. Note: it is possible to rename this file, e.g.
"Q549_SW_version.upg", this in case there are more than
one "autorun.upg" files on your USB stick
4. Plug the prepared USB stick into the TV set, and select the
"autorun" file in the displayed browser on the screen
5. Now the main TV software will be loaded automatically,
supported by a progress bar
6. Set the correct "display code" via "062598-HOME-xxx",
where "xxx" is the 3-digit display panel code (see sticker on
the side/bottom of the cabinet).
6.6.2 When no picture is available
Due to a possible wrong display option code in the received
Service SSB (NVM), no picture can be available at start-up and
thus no download application will be visible. Here you can
proceed and finalize step by step to load the main TV software
via the UART logging on the PC (for visual feedback).
1. Start-up the TV set, equipped with the Service SSB, and
enable the UART logging on the PC (see for settings 5.8
Fault Finding and Repair Tips 5.8.6 Logging)
2. The TV set will start-up automatically in the download
application if main TV software is not loaded
3. Plug the prepared USB stick into the TV set, press cursor
"Right" to enter the list, and navigate to the "autorun" file in
the UART logging printout via the cursor keys on the
remote control. When the correct file is selected, press
"OK"
4. Press cursor "Down" and "OK" to start the flashing of the
main TV software. Printouts like: "L: 1-100% , V: 1-100%
and P: 1-100%" should be visible now in the UART logging
5. Wait until the message "Operation successful!” is
displayed and remove all inserted media. Restart the TV
set
6. Set the correct "display code" via "062598-HOME-xxx",
where "xxx" is the 3-digit display panel code (see sticker on
the side/bottom of the cabinet).
6.6.3 Use of repaired SSBs instead of new
Repaired SSBs on stock will obviously already contain main TV
software. This implies that only a main software upgrade is
required if you use a “repaired” SSB for board swap instead of
a “new” SSB.
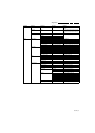
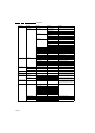
6.7 Total Overview SAM modes
Table 6-4 SAM mode overview
18310_221_090318.eps
090319
Main Menu Sub-menu 1 Sub-menu 2 Sub-menu 3 Description
Hardware Info A. SW VERSION e.g. “Q5492_1.26.15.0” Display TV & Standby SW version and CTN serial
number.
B. Standby processor version e.g. “STDBY_88.68.0.0”
C. Production code e.g. “See type plate”
Operation hours Displays the accumulated total of operation hours.TV
switched “on/off” & every 0.5 hours is increase one
Error Displayed the most recent errors.
Reset error buffer Clears all content in the error buffer.
Alignment Tuner AGC RF-AGC Take over point adjustment (AGC default
value is 80)
Whitepoint Colour temperature Normal 3 different modes of colour temperature can be se-
lected
Warn
Cool
White point red
LCD White Point Alignment. For values,
see Table 6-1 White D alignment values
.
White point green
White point blue
Red black level offset
Green black level offset