


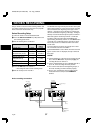

PROGRAM TIMER RECORDING
A timer recording of more than 24 hours can only be set
on the 7th (SAT) and 8th (DLY) lines of the (TIMER SET)
menu.
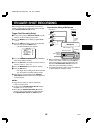
Example 2: To record every week from Friday at 9:00
PM (21:00) to Monday at 7:00 AM, in
H72-hour mode (recording speed).
œ Follow the Before starting steps, under “NORMAL
RECORDING”.
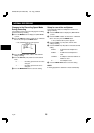
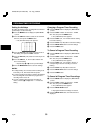
1 Press the MENU button to display the (MAIN MANU
1) menu.
2 Press the SHIFT ] button to select the “7. TIMER
SET” line, then press the MENU button.
ø
The (TIMER SET) menu appears.
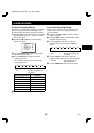
@@@@@@<TIMER@SET>
WEEK@START@@STOP@@@SPD
SUN@@--:--@@--:--@----@N
MON@@--:--@@--:--@----@N
TUE@@--:--@@--:--@----@N
WED@@--:--@@--:--@----@N
THU@@--:--@@--:--@----@N
FRI@@--:--@@--:--@----@N
SAT@@--:--@@--:--@----@N
DLY@@--:--@@--:--@----@N
EXT@@*****@@*****@----@N
3 Press the SHIFT ] (or \) button, until “SAT” is
flashing.
4 Press the DATA l (or j) button to set the desired
start day of the week (ex: FRI), then press the SHIFT
* button.
ø
The recording start hour position starts flashing.
5 Press the DATA l (or j) button to set the recording
start hour (ex: 21), then press the SHIFT * button.
ø
The recording start minutes position starts
flashing.
6 Press the DATA l (or j) button to set the recording
start minutes (ex: 00), then press the SHIFT * button.
ø
The recording stop hour position starts flashing.
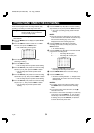
7 Press the DATA l (or j) button to set “**” for the
recording stop hour.
ø
The rest of the line settings will change to
“**:** **** *”
, the day of the next line will
change to the next day and the start time will
change to
“**:**”
automatically.
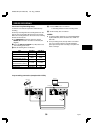
8 Press the SHIFT * and ] button, until the day of the
week of the 8th line is flashing.
9 Press the DATA l (or j) button to set the desired
stop day of the week (ex: MON), then press the
SHIFT * button.
ø
The recording stop hour position starts flashing.
F Press the DATA l (or j) button to set the recording
stop hour (ex: 07), then press the SHIFT * button.
ø
The recording stop minutes position starts
flashing.
G Press the DATA l (or j) button to set the recording
stop minutes (ex: 00), then press the SHIFT * button.
ø
The “SPD” (recording speed) position will start
flashing.
H Press the DATA l (or j) button to select the
recording speed mode (ex: H72), then press the
SHIFT * button.
ø
“N” will start flashing.
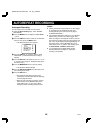
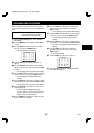
I Press the DATA l (or j) button to select “Y”.
@@@@@@<TIMER@SET>
WEEK@START@@STOP@@@SPD
SUN@@--:--@@--:--@----@N
MON@@--:--@@--:--@----@N
TUE@@--:--@@--:--@----@N
WED@@--:--@@--:--@----@N
THU@@--:--@@--:--@----@N
FRI@@--:--@@--:--@----@N
FRI@@21:00@@**:**@****@*
MON@@**:**@@07:00@@H72@Y
EXT@@*****@@*****@----@N
J Follow steps G and H under “PROGRAM TIMER
RECORDING” on page 31.
RD2QD/NA (DTL-4800 GB) Tue. Aug., 08/2000
32 English