Teledyne API Model 200A NO
X
Analyzer Instruction Manual, 02246, Rev. G, DCN 5247
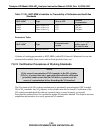
Table 7-7-18: Definition of Level 1 and Level 2 Zero and Span Checks
(from Section 2.0.9 of Q.A. Handbook for Air Pollution Measurment Systems)
LEVEL 1 ZERO AND SPAN CALIBRATION
A Level 1 zero and span calibration is a
simplified, two-point analy zer calibration used
when analy zer linearity does not need to be
checked or verified. (Som etimes when no
adjustments are made to the analyzer, the Level 1
calibration may be called a zero/span check, in
which case it m ust not be confused with a Level
2 zero/span check.) Since m ost analyzers have a
reliably linear or near-linear output response with
concentration, they can be adequately calibrated
with only two concentration standards (two-point
concentration). Furthermore, one of the standards
may be zero concentration, which is relatively
easily obtained and need not be certified. Hence,
only one certified concentration standard is
needed for the two-point (Level 1) zero and span
calibration. Although lacking the advantages of
the multipoint calibration, the two-point zero and
span calibration--because of its sim plicity--can
be (and should be) carried out m uch m ore
frequently. Also, two-point calibrations are easily
automated. Frequency checks or updating of the
calibration relationship with a two-point zero and
span calibration im proves the quality of the
monitoring data by helping to keep the
calibration relationship m ore closely matched to
any changes (drifts) in the analyzer response.
LEVEL 2 ZERO AND SPAN CHECK
A Level 2 zero and span check is an "unofficial"
check of an analyzer's response. It m ay include
dynamic checks m ade with uncertified test
concentrations, artificial stim ulation of the
analyzer's detector, electronic or other ty pes of
checks of a portion of the analyzer, etc.
Level 2 zero and span checks are not
to be used
as a basis for analy zer zero or span adjustm ents,
calibration updates, or adjustm ent of ambient
data. They are intended as quick, convenient
checks to be used between zero and span
calibrations to check for possible analy zer
malfunction or calibration drift. Whenever a
Level 2 zero or span check indicates a possible
calibration problem, a Level 1 zero and span (or
multipoint) calibration should be carried out
before any corrective action is taken.
If a Level 2 zero and span check is to be used in
the quality control program , a "reference
response" for the check should be obtained
immediately following a zero and span (or
multipoint) calibration while the analy zer's
calibration is accurately known. Subsequent
Level 2 check responses should then be
compared to the m ost recent reference response
to determine if a change in response has
occurred. For autom atic Level 2 zero and span
checks, the first schedul ed check following the
calibration should be used for the reference
response. It should be kept in m ind that any
Level 2 check that involves only part of the
analyzer's system cannot provide inform ation
about the portions of the sy stem not checked and
therefore cannot be used as a verification of the
overall analyzer calibration.
7-28
PRINTED DOCUMENTS ARE UNCONTROLLED


