


Inspired Signage XPress Programming
28
Inspired XPress - Programming Guide
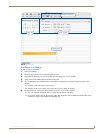
3. Drag and drop from the browsing panel of your XPress project any individual media you want to schedule into the
calendar view in the Editing panel. Define the start duration of each media and its recurrence pattern, if desired.
4. Repeat the previous step for each media you want to schedule and save your changes.
5. Open the index.svg file of your XPress project. Drag and drop the new.ics file as a new layer into your index.svg
file.
6. Save your changes.
The file index.svg may already contain layers. You may decide to remove the existing layers and leave a single one
associated to the new.ics. In this case when you publish your project to a IS-SPX Player, the content will be played
according to your schedule. You may also decide to combine your schedule with a background image, which would be
an additional layer in your index.svg. This choice would guarantee that at least the background image will be displayed
for those time periods when you have not planned any content. Multiple layers may also be combined with multiple
schedules.
Create a New Schedule
To create a new schedule in XPress:
1. Open the project where the schedule needs to be added.
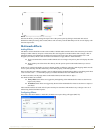
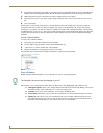
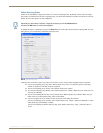
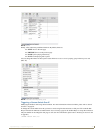
2. Use the right-click pop-up menu to create a New Schedule (FIG. 37).
3. A new file new.ics will be created. This is the scheduler.
4. Rename the scheduler to an appropriate name for your project.
The scheduler can be dropped into a multilayer document or a playlist as any other media.
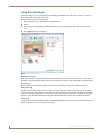
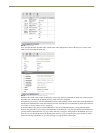
Open a Schedule
Double-click the schedule document (*.ics) to open the Calendar view in the Editing panel.
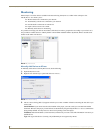
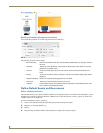
The Calendar view is organized into 4 zones (FIG. 36). Each zone has been highlighted with a different color.
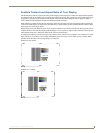
Management options: Allow you to change the time frame that will be shown in the Editing zone. You can
choose between day, week, month and year, or create a new empty event.
Calendar: Allows you to select which day will be visible in the Editing zone.
Event Options: This allows you to control the start and duration of an event and eventually its recurrence.
Editing zone: This allows you to view and edit the events in your schedule. Different time scales can be
selected from the Management zone. Use the day and week scales to change positions and the durations of
the events. Use the month and year view to have an overview of your schedule.
FIG. 37 Schedule menu
The Calendar view uses the local time settings of your PC.