


Interactivity
73
Inspired XPress - Programming Guide
4. When finished, press the Save button at the top of the Edit Mode workspace to save your changes.
Testing the Project
Now is time to test the project and make sure that the menu works correctly. To start:
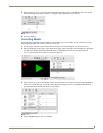
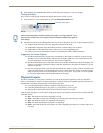
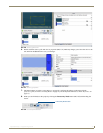
1. In the Animation Controls toolbar (FIG. 93), press the Interactivity Mode button.
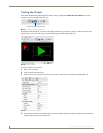
2. In Interactivity Mode, mouse and keyboard events are now sent to the project. Test your content using the keyboard:
Attempt a keystroke from a previously mapped key and observe the result.
In Edit Mode, change the Action ID of the keystroke to a variable change, such as NEXT.
In Edit Mode, set the selected item menu variable (menu) to the configured Page ID.
If the event is received, the media file with the corresponding Action ID is enabled and shown.
Suggestions for Further Projects
Besides the keyboard, XPress projects may be controlled via other inputs. For instance, a project on an IS-
SPX Player may be controlled directly with keystrokes through its USB port, or by using the network API
(for more information, refer to Enabling the Network API on page 88).
Besides standard button effects, other button effects may be utilized with the help of keystroke mapping. For
instance, you could use a keyboard to change a particular displayed text using the news templates, or to play
and pause a video file.
Network configuration options also offer other possibilities, For instance, a project could be constructed with
a displayed menu running on one IS-SPX Player and video or other media files running on another. Using the
ability to network players (for more information, refer to Synchronization on page 52), it is also be possible
to control the output of more than one IS-SPX Player via one menu.
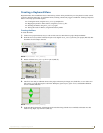
Playback Projects
In some circumstances, you may want to use XPress to create media player-like applications. This may include the
ability to run introductory videos in an exposition display, or running a video file to augment a particular operation on a
keyboard menu. Creating a playback project involves three major steps:
Controlling the play/pause mode of a media file, using the playback.svg file.
Controlling menu buttons (play, stop, pause, etc.), using the menu_button.svg file.
Showing and controlling the progress of the media file, using the slider.svg file.
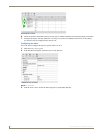
In this example, the object is to create a basic media player that runs one media file. This file will be controlled with five
individual controls:
Play - The media file runs from its beginning to its end.
Pause - The media file stops at the selected point, restarting at that point when play resumes.
Stop - The media file returns to its beginning when restarted.
Back - The media file automatically returns to its beginning.
Slider - The media file may be run forward or in reverse, depending upon where in its scale the slider cursor
is located.
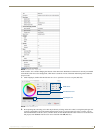
FIG. 93 Animation Controls toolbar
Interactivity Mode button
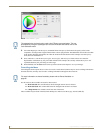
When Interactivity Mode is enabled, editing your project is no longer possible. If you
need to make corrections to your project, press the Interactivity Mode button again to
allow editing.