


Interactivity
64
Inspired XPress - Programming Guide
Creating a Touch Screen Menu
Now, let’s begin with creating a basic touch screen menu. The menu will not have too many features: upon pushing a
button on the touch screen, the final project will start the display of media. That media can be an item on part of the
screen, a video on the full screen, or another menu. You will create the buttons using the menu_buttons.svg file, select the
media using menu_media.svg, and test the result in XPress, using the Interactivity mode.
Creating Buttons
To start, create a new folder in the My Projects tab, called Touch Screen. The only file in this folder will be index.svg.
1. Double-click on index.svg to open it in the Workspace.
2. Click Save, and choose a location for the files to reside.
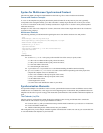
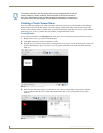
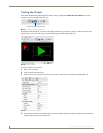
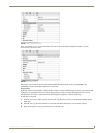
3. Open the Interactivity folder in My Templates and drag the file menu_buttons.svg onto the Workspace. A button will
appear in the Workspace, and a menu_buttons.svg entry appears in the Buttons tab of the Edit Mode Workspace
(FIG. 72).
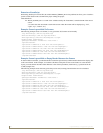
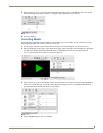
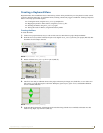
4. Buttons can be made from images, text, SVG files, or even videos. From the folder in My Templates, open the
Cliparts folder and then the Arrows folder. Drag and drop the E Red.svg file over the button in your project
(FIG. 73).
The names of the files in the Interactivity folder may be changed and the file will still
function normally in XPress. However, make sure either to use intuitive names for
each file, or document the name changes and keep the information in a safe place. If
the names of SVG files are changed, it can be difficult to ascertain their function later.
FIG. 72 Buttons appearing in Workspace
FIG. 73 Arrow on button